• Skip to primary navigation
  • Skip to main content
  • Skip to primary sidebar
  • Skip to footer
  • Home
  • Tutorials
  • Crafts
    • Jewellery Making
      • Everything jewellery
      • Beadwork
      • Wire jewellery
      • Book reviews
    • Feltmaking
    • Crochet
    • Knitting
    • Kid’s crafts
    • Book reviews
    • Other
  • Inspiration
    • Everything inspirational
    • Handmade showcase
    • Colours
    • Materials
    • Crafty Links
    • Start a Blog
  • Lifestyle
    • Tips
    • Recipes
  • About
    • Advertise
  • Contact
  • Privacy Policy
    • Cookie Policy
  • Disclaimer / Disclosure

Craftaholique

Embracing The Handmade Life | UK Craft Blog

You are here: Home / Jewellery making / Beadwork / Beadwork Tutorial! Learn Flat Odd and Even Count Peyote Stitch

April 6, 2017

Beadwork Tutorial! Learn Flat Odd and Even Count Peyote Stitch

Flat Odd and Even Peyote Stitch Beadwork Tutorial from Craftaholique

*Affiliate links are included in this post.

If you’re a long time reader of this blog, you’ll probably know I love beadwork and peyote stitch in particular!

Although I’ve published a few peyote patterns in recent months, I haven’t gotten around to doing a tutorial on this stitch – until now that is!

In this post, learn how to do both flat even count peyote stitch and flat odd count peyote stitch with my step-by-step guide below.

Peyote stitch is a great beadweaving technique to master – it’s fun and easy for beginners to get the hang of. You can create some amazing beaded bracelets, rings, necklaces and even earrings with this stitch (see patterns I’ve created for my Etsy Shop)!

Gather your beading materials to begin with! You’ll need the following:

  • A selection of Miyuki Delicas – these are cylinder shaped beads that are perfectly uniform in size. Miyuki Delicas work really well in peyote stitch as the beads will slot together nicely thanks to their shape. If you don’t have Miyuki Delicas, you can also use Toho Treasures which are similar type of bead. If you’re a beginner, you might want to use size 8/0 beads as these are larger and easier to work with. I’ve used size 10/0 Miyuki Delicas.
  • Beading thread – Nymo is a good brand to use, it’s strong and doesn’t break easily.
  • Beading needle – you’ll need a needle with an eye small enough to go through these tiny beads – size 10 or 12 will be fine.
  • Scissors to cut your thread.
  • Any other bead to use as a stop bead.

Let’s start with flat even count peyote stitch!

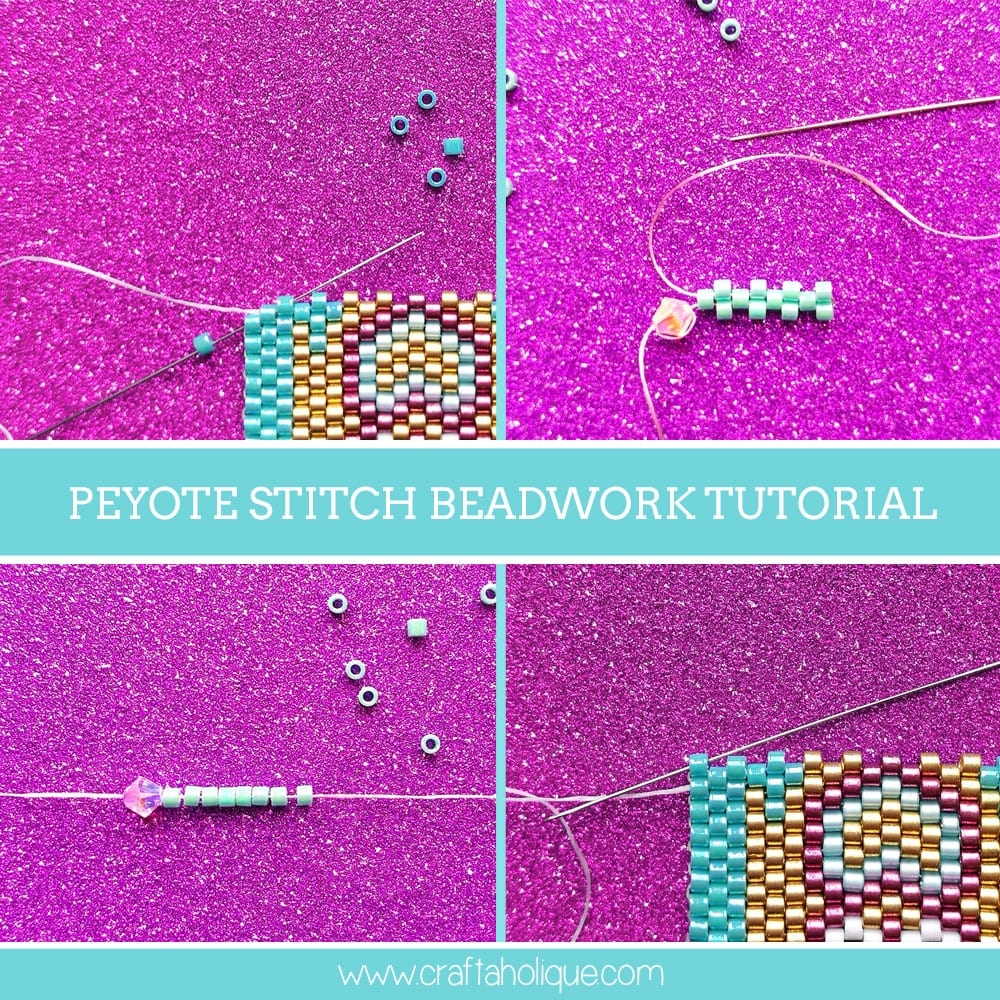
Flat even count peyote stitch – step 1

Flat even count peyote stitch tutorial - beadwork tutorial from Craftaholique

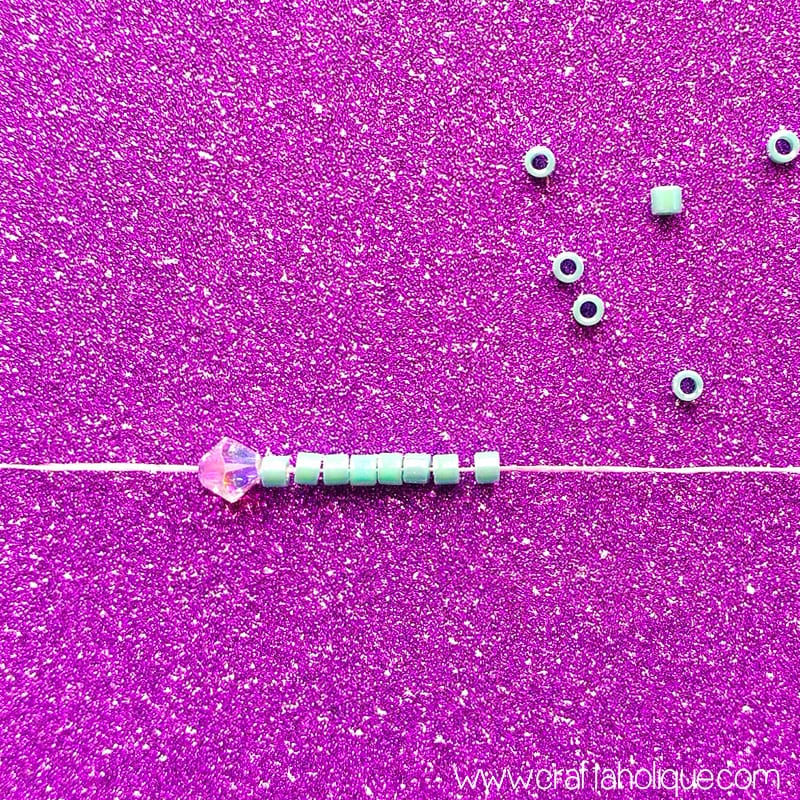
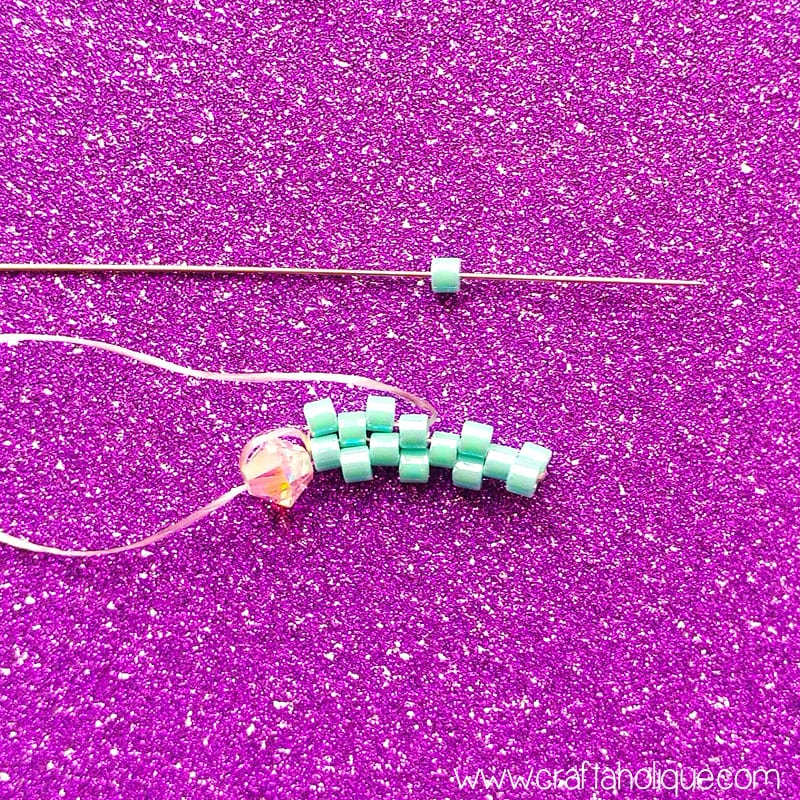
Thread your needle with the beading thread and pick up your stop bead first of all. In the photo above, you’ll see that I used a bicone bead to stop the Miyuki Delicas from falling off the thread.

Move the stop bead towards the end of the thread and then go through the bead again the same direction to secure it to the thread. Then pick up an even number of Miyuki Delicas e.g. 8 as shown in the pic. These beads will form rows 1 and 2 – I’ll explain why shortly!

Flat even count peyote stitch – step 2

Flat even count peyote stitch tutorial - beadwork tutorial from Craftaholique

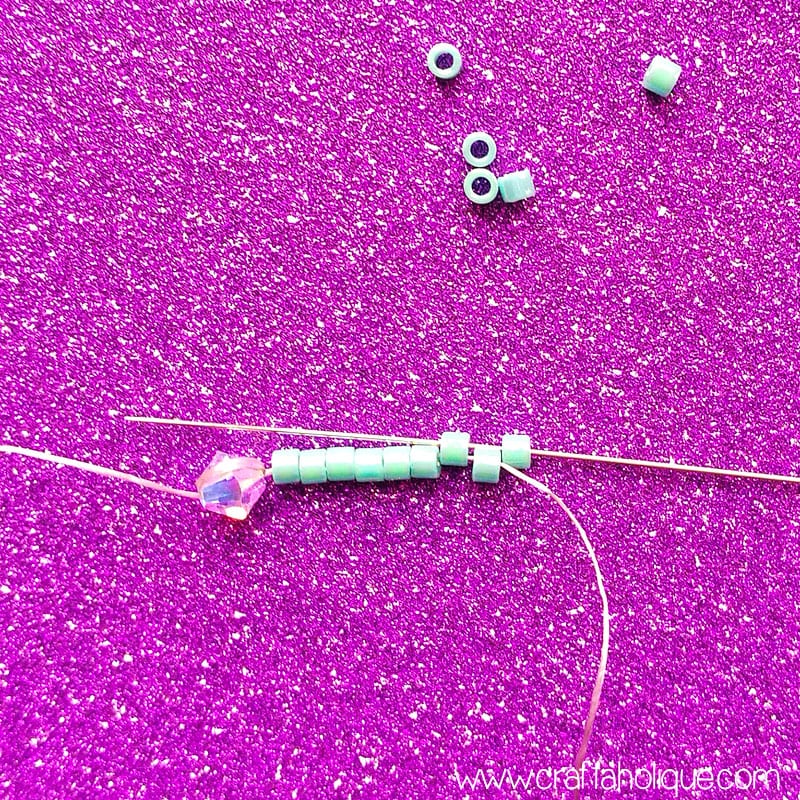
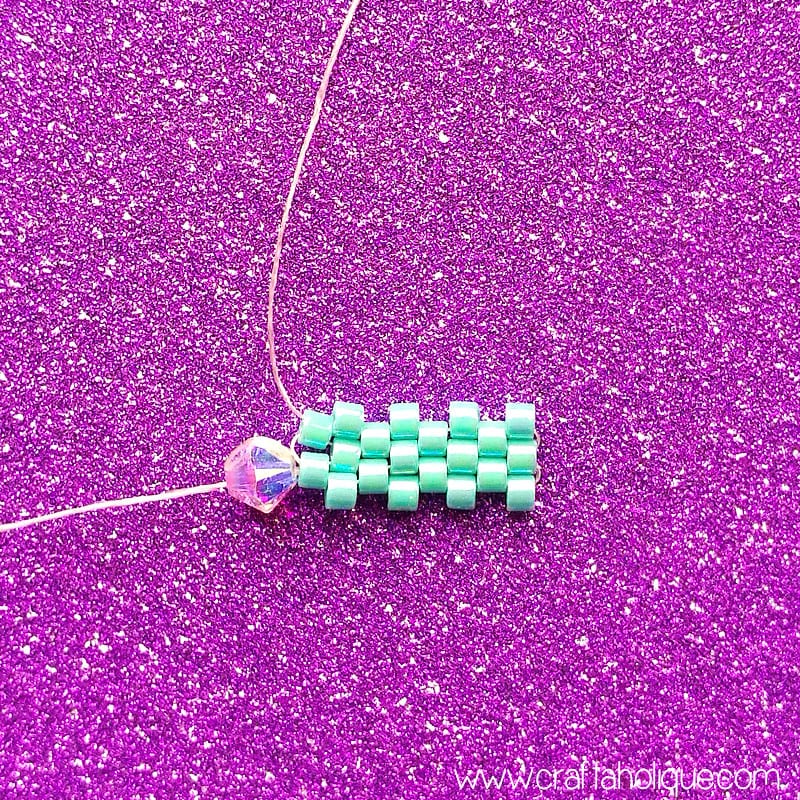
Now pick up one more Miyuki Delica bead. Working backwards, skip one bead and pass your needle through the next bead as shown in the photo above. The new bead you’ve picked up will sit on top of the 8th bead from step 1.

Flat even count peyote stitch – step 3

Flat even count peyote stitch tutorial - beadwork tutorial from Craftaholique

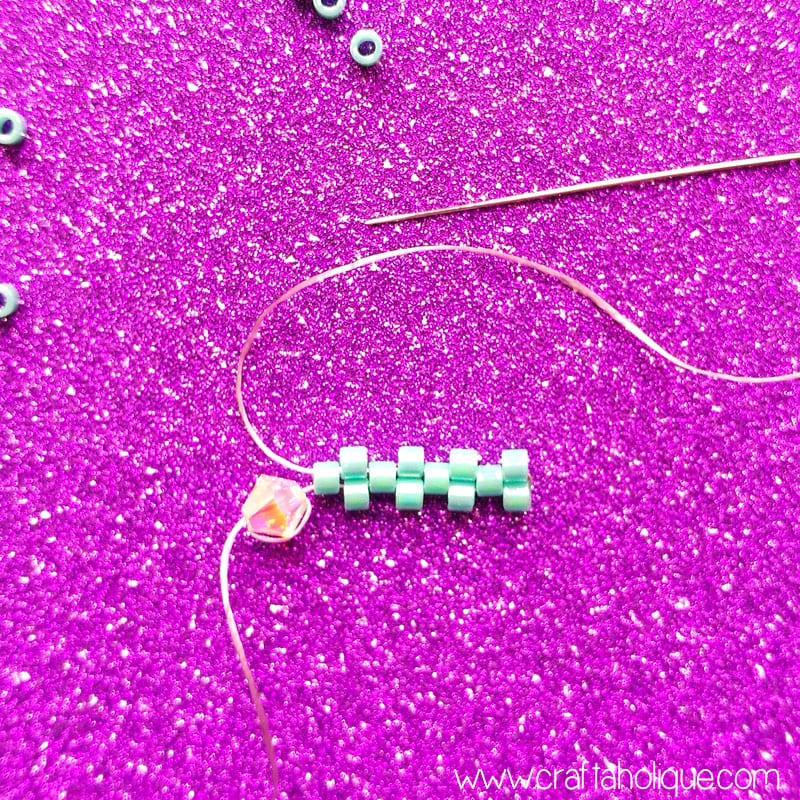
Work your way backwards until you reach the other side of the beadwork (back to the side you started from), repeating the above step. Pick up a bead, skip a bead and pass through the next bead along in the row. It helps if you think of this stitch as building a wall made of beads and you want each “brick” to sit nicely side by side!

As you’ll see from the above pic, the 8 beads from the first row have now become rows 1 and 2. Some beads are sitting high and some are sitting low. After you’ve done step 3, you’ll have three rows of beads.

Flat even count peyote stitch – step 4

Flat-even-count-peyote-stitch-step-4

When you make the turn to start the next row, you’ll see a “high” bead sticking up. Pick up a bead and pass your needle through that bead. Then continue to pick up a bead, skip the bottom bead and go through the high bead until you reach the end of row 4.

You may find it easier to flip your beadwork around as you work. That’s fine for this tutorial and you can do this if you’re working to a pattern, as long as you know which side you started from. Having a stop bead in place will help you identify this!

Flat even count peyote stitch – step 5

Flat-even-count-peyote-stitch-step-4

Flat even count peyote stitch is all about repetition. Just keep following those same few steps until your beadwork reaches the desired length. If you want the beadwork to be wider, you’ll need to add more beads into rows 1 and 2, so perhaps use 12 or 16.

When you’ve mastered this beadweaving technique, you can start to introduce patterns and get really creative with your work!

How does flat ODD count peyote stitch differ from flat EVEN count peyote stitch?

The difference is to do with the number of beads per row. Odd count peyote stitch uses an odd number of beads and so the technique is slightly different. It’s not difficult, but there’s a little trick to making the turn at the end of a row.

Flat odd count peyote stitch – step 1

Flat odd count peyote stitch tutorial - beadwork tutorial from Craftaholique

I’ve used an example of some beadwork that I’m working on for this – watch this space for details of a new pattern!

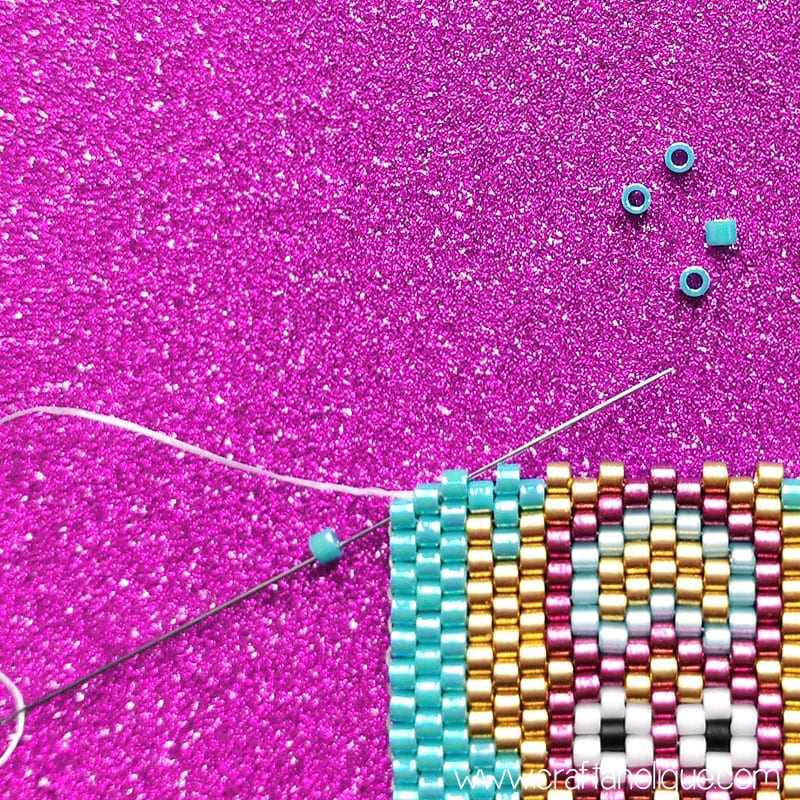
For this piece of beadwork, I’ve used 21 beads per row. When you first start out doing this version of peyote stitch (when you make your first turn), you’ll do the same as you would in flat even count peyote stitch – pick up a bead, skip a bead and go back through the one before.

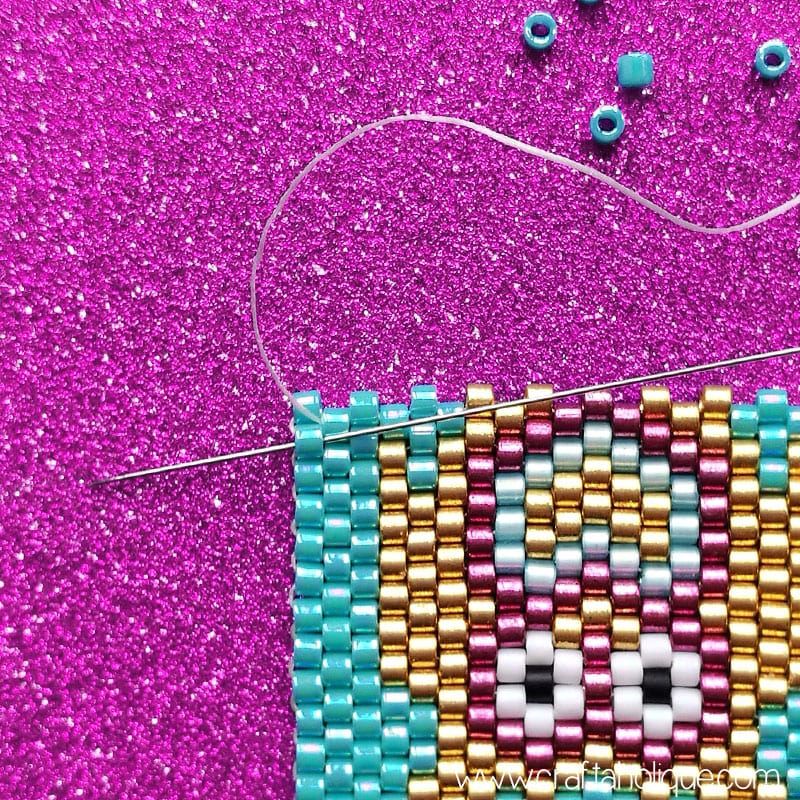
When you reach the end of that row (that’ll be row 3, because rows 1 and 2 are formed from the first line of beads you’ll pick up), you’ll see that you won’t simply be able to pick up a bead and go through the high bead. Otherwise, your beads won’t sit where they should.

What you’ll need to do instead is pick up a bead and pass your needle through the “low” bead at the end of the beadwork and through the next two beads diagonally – see the above pic.

Flat odd count peyote stitch – step 2

Flat odd count peyote stitch tutorial - beadwork tutorial from Craftaholique

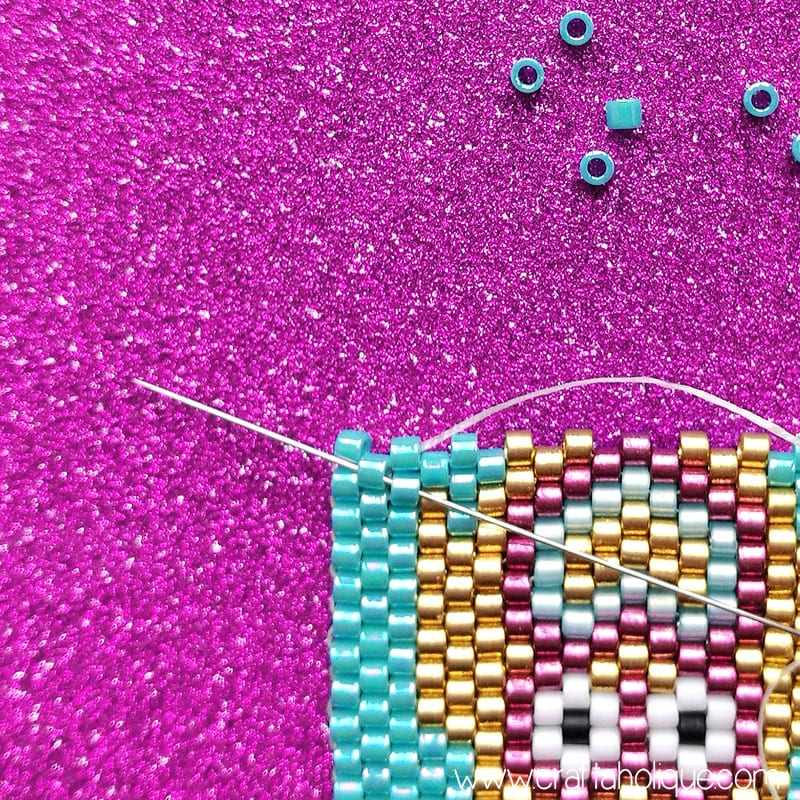
Then, pass your needle and thread through the bead directly under the one where your thread is exiting out of…

Flat odd count peyote stitch – step 3

Flat odd count peyote stitch tutorial - beadwork tutorial from Craftaholique

Then pass your needle back through the original “low” bead at the edge of your beadwork…

Flat odd count peyote stitch step 4

Flat odd count peyote stitch tutorial - beadwork tutorial from Craftaholique

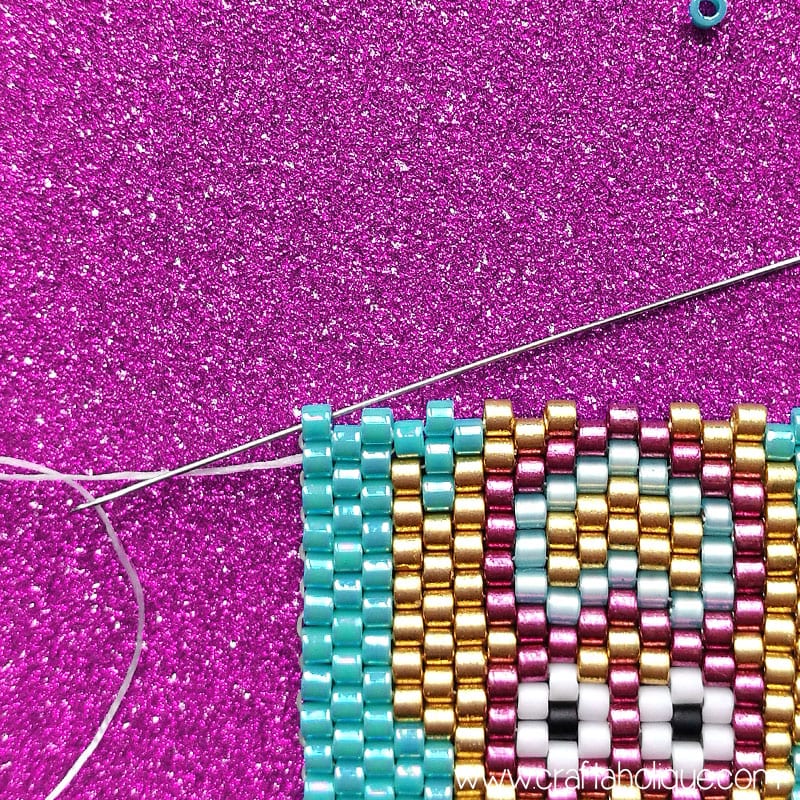
And finally, pass your needle through the bead you picked up in step 1 which will be sitting nicely in place by this point! Now you’re ready to pick up a new bead and go through the next high bead just like you would do when working in flat even count peyote stitch.

Although making the turn might seem a little complicated to begin with, it’s really not. It’s just like sewing a figure of 8 through your beads to get your new bead into the right place for the start of a new row. You’ll only have to do this every second row and once you’ve got the hang of it, you’ll be able to do it really quickly!

Peyote stitch beadwork patterns

When you’re ready to try out some patterns, check out these ones I’ve put together!

  • Ombre Ice Peyote Stitch Beaded Bracelet
  • Scattered Waves Peyote Stitch Beaded Bracelet
  • Colourful Argyle Peyote Pattern for Beaded Bracelet
  • Reindeer Bracelet Peyote Stitch Pattern

I hope you found this peyote stitch tutorial useful! Please take a minute to share this online with your social media followers if so!

*Affiliate links are contained in this post. This means that I will receive a small commission should you decide to purchase anything through one of my links, at no cost to you. I only ever recommend products that I think are great and any commissions received help me to keep this site up and running! Thanks for using my links if you are able to!

Flat even count and flat odd count peyote stitch tutorial from Craftaholique. Beadwork techniques.

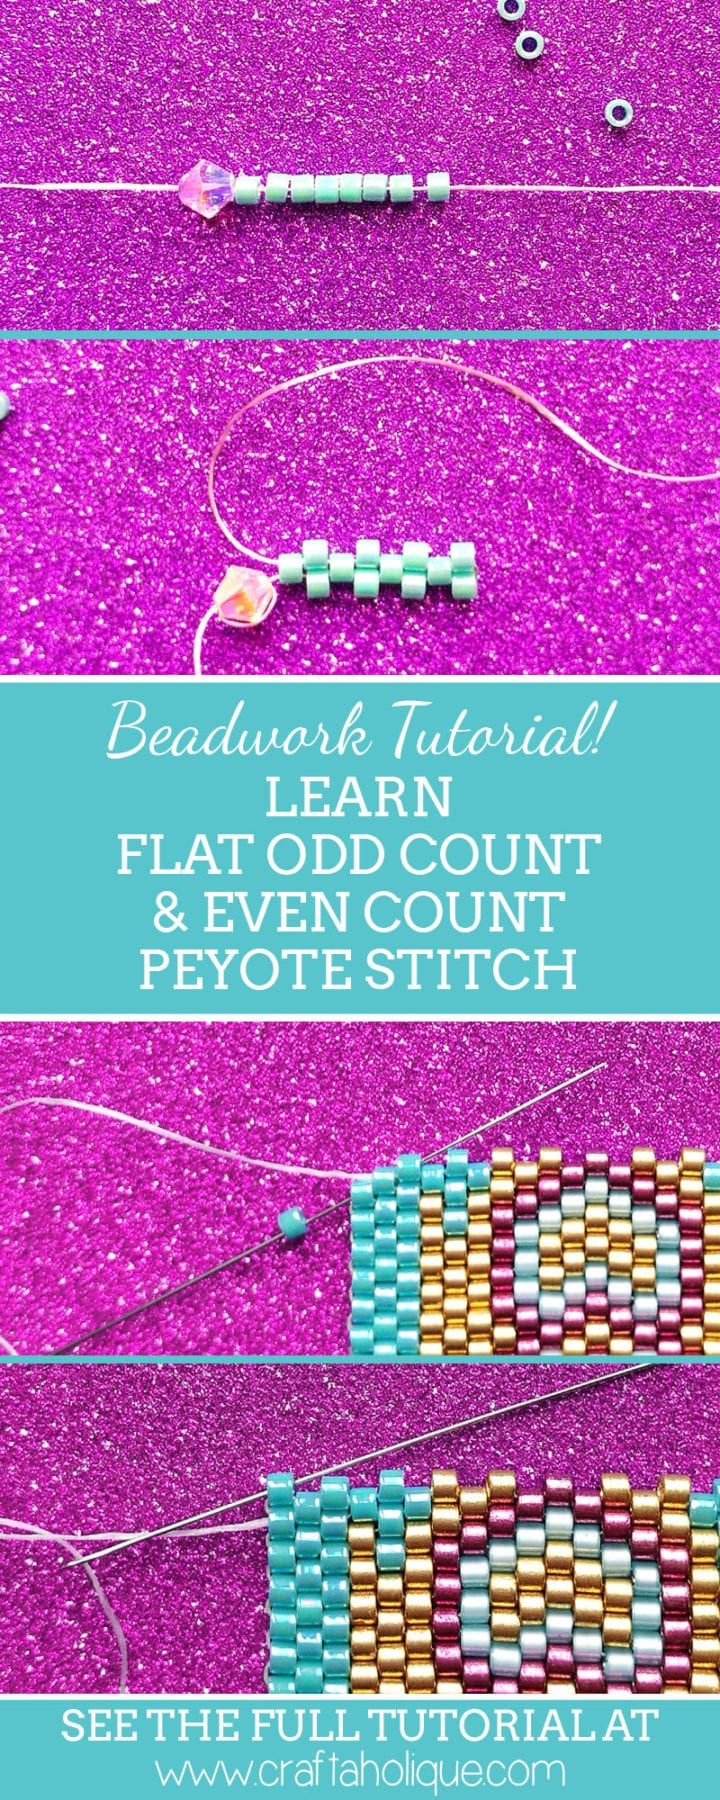
*Image source: all images © Craftaholique

Share this post!
  • save 
  • share 
  • tweet 
  • email 

Filed Under: Beadwork, Jewellery making, Tutorials Hayley 20 Comments

Reader Interactions

Handmade Showcase: Easter Gift Ideas
How Starting a Blog Can Skyrocket Your Etsy Business

Comments

  1. 1

    Lyn says

    March 18, 2018 at 10:13 am

    Amazing tutorial, so clear and precise. The very best tutorial I’ve seen. Thank you,

    Reply
    • 2

      Hayley says

      March 19, 2018 at 11:41 am

      You’re very welcome, thank you so much for the kind comment! 🙂

      Reply
    • 3

      Christina says

      April 18, 2019 at 10:21 pm

      Just what i need. Thank you so much

      Reply
  2. 4

    andrea poole says

    April 19, 2018 at 3:26 pm

    wow.. thank you for the details tutorial. i have always had a hard time doing both odd and even. but now i am going to give it a try.

    Reply
  3. 5

    Mari says

    August 31, 2018 at 7:29 pm

    That you for the great detailed pictures. I I’m having trouble though figuring out how many rooms I have done in a pattern. For instants if it says continue for 28 rows…… how do I count that. Some people say count on the diagonal others say count the straight line of beads n the long edge. Thoroughly confused because the numbers differ greatly.

    Reply
    • 6

      Hayley says

      September 28, 2018 at 12:35 pm

      It is tricky to count the rows in peyote. I would say counting the rows diagonally is best, but what I do is print off the bead chart, put a ruler under the line I’m beading and move the ruler up a line as I get to a new row! If I leave my beadwork for a while, I’ll mark the row I need to do next at the side with a pen. I hope this helps!

      Reply
  4. 7

    Joan says

    September 15, 2018 at 8:50 am

    Thank you
    This has cleared up the odd count peyote that I have been avoiding. I now understand how it works and will happily tackle a new project knowing I can come back and look again if I forget how.

    Reply
    • 8

      Hayley says

      September 28, 2018 at 12:30 pm

      I’m so glad this has helped you! Thanks for commenting!

      Reply
  5. 9

    Ina Zimnickaja says

    October 19, 2018 at 8:09 pm

    thank you

    Reply
    • 10

      Hayley says

      October 23, 2018 at 12:54 pm

      You’re welcome!

      Reply
  6. 11

    Hayley says

    January 10, 2019 at 2:07 pm

    Thank you very much for your kind words! 🙂

    Reply
  7. 12

    Teresa Edwards says

    May 21, 2019 at 9:58 am

    I am looking for your full
    Peyote stitch tutorial. Can you please direct me to the full tutorial? I have not been able to find it and my bead group raves about it. M

    Reply
    • 13

      Hayley says

      May 23, 2019 at 10:43 am

      Hi! Thanks for your interest in my tutorial – this is the full version that you’re reading at the moment. If you have any specific queries, do come back to me and I’ll try to answer them.

      Reply
  8. 14

    Elois Taylor says

    July 4, 2019 at 3:37 am

    Hi I would like to see how you do row 3. I cannot get started on the gold turquoise and white chevron bracelet.

    Reply
    • 15

      Hayley says

      August 17, 2019 at 6:42 pm

      Hello, I think I may have emailed you about this via my Etsy shop? Do get in touch there if you have any more questions.

      Reply
  9. 16

    Ms Madjitey says

    November 29, 2019 at 7:59 am

    Great job! l loved your illustration. It made it easy for me to follow the first time. Kudos!

    Reply
    • 17

      Hayley says

      January 17, 2020 at 5:58 pm

      Glad you found this tutorial useful! 🙂

      Reply
  10. 18

    Faith Ann Rigg says

    February 5, 2021 at 2:34 am

    I am learning odd count peyote. I have 35 beads for 1&2. Then 18 beads then 17 I know how to add a bead but my chart says 17 beads where do I get the bead I am supposed to use to make it 18 ?

    Reply
  11. 19

    Monica Shaw says

    August 5, 2021 at 2:06 pm

    I’m a newbie to jewelry making and can’t wait. To learn these bead patterns. So far I’ve made just some simple pieces, it am ready to move on to more challenging things. It was recommended I start with these two so here I go. The tutorials seem very detailed and easy to follow. Wish me luck

    Reply
    • 20

      Hayley says

      September 7, 2021 at 8:26 pm

      Good luck! Hope you enjoy beading!

      Reply

Leave a Reply Cancel reply

Your email address will not be published. Required fields are marked *

Primary Sidebar

Welcome!

Welcome!

Hi, I'm Hayley! Thanks for visiting Craftaholique, my little corner of the internet where I blog about crafts, beading, handmade products and lots of other stuff relating to creativity. Stay a while and have a browse!

Connect

  • E-mail
  • Facebook
  • Instagram
  • Pinterest
  • Twitter

Advert


Instagram

Work in progress! A new pattern I'm working on. Lo Work in progress! A new pattern I'm working on. Loving the metallic green colour. 😍 #beads #beadwork #peyote #bracelets #braceletpattern #peyotestitch #jewellerymaking #crafts #crafting
Hi all! It's been a very long time since I've post Hi all! It's been a very long time since I've posted here. I've been working on a new venture - surface pattern design. This is my first attempt at a seamless pattern. It's part of a collection I'm working on called 'Mum's Garden'. Mum loved hedgehogs, and they always frequented her garden to enjoy the food she put out for them. 😍 Honest opinions! What do you think? Could this work for wrapping paper, notebook covers, etc? Thanks for looking! #surfacepatterndesign #creativebusiness #creativeentrepreneur #graphicdesign #digitalart #hedgehogs #patterns #seamlesspattern
I finally finished this bead loom bracelet! Starte I finally finished this bead loom bracelet! Started it before the first lockdown... I think I lost my mojo for a while! So this is a flat piece of beadwork, which I then glued onto a cuff bracelet blank.
Started this loom beading project last May... Prou Started this loom beading project last May... Proud to say I finally finished it more than one year later! More photos coming soon! What's your longest ever project? #beads #beadwork #loombeading #crafts #crafting #craftblogger #crafty #longestprojectever
My latest beaded creation! Peyote with a twist. Lo My latest beaded creation! Peyote with a twist. Love the chunkiness of it and how it shimmers with the galvanised silver Miyuki Delica beads. #beads #beadwork #beadweavingpeyote #peyote #flatpeyotestitch #silver #beaded #beadedjewelryofinstagram #beadedring #beadedjewelry #miyukidelica #miyukipeyote #miyuki #miyukibeads #beading #crafts #crafting #craftblogger
My latest tubular peyote bracelet! It's made up of My latest tubular peyote bracelet! It's made up of hundreds of tiny Miyuki Delica beads in vibrant colours of metallic blue, silver, white and pink. The pattern is available in my Etsy shop, Craftaholique Designs. #beads #beadwork #beadweavingpeyote #tubularpeyotestitch #miyukipeyote #beading #beadingpattern #etsyshop #etsysellersofinstagram #etsyseller #etsyshopowner #bracelets #vibrant #tubularpeyote #beadaddict #beadaddiction #miyuki #miyukibeads
My finished bead embroidery - I've used it as an e My finished bead embroidery - I've used it as an embellishment for a beadwork storage case I've just made. I upcycled the case from an old padfolio / conference folder. Inside there's an integrated beading mat where I can do my beadwork - no more beads rolling away! I've posted a tutorial on my blog (link in bio).
My latest project... Bead embroidered flowers! I'm My latest project... Bead embroidered flowers! I'm making this as an embellishment for something. Will post the final project pic soon! #beadwork #beadembroidery #embroidery #embroiderydesign #embroideryart #embroidelicious #flowers #beads #beadedembroidery #beadedembellishment #crafts #crafting #keepcraftingcarryon #keepcraftalive #keepcraftingandcarryon #beaded #beadaddict #beadaddiction #embroideryhoop #craftblogger #crafty
Just finished this set of Miyuki Delica bracelets Just finished this set of Miyuki Delica bracelets in pretty colours of peach, white, pink and gold! I made the two diamond pattern bracelets using a bead loom. The single strand bracelet I just strung together. What do you think to my creation? #beads #beadwork #beadloom #beadloompattern #beadloomingbracelet #beadlooming #beadloombracelets #beadweaving #loombeading #loombead #beadingpattern #beadedjewelryofinstagram #beadaddict #beadaddiction #miyuki #miyukibeads #miyukidelica #crafts #crafting #craftblogger #crafty #bead #craftblogger #beadedbracelets #cuffbracelet #stackingbracelets
Though I've been beading for many years, this is t Though I've been beading for many years, this is the first time I've used a bead loom! It's pretty straightforward and quicker than peyote. #beading #beadloom #beadlooming #beadloomingbracelet #beadloomingnewbie #beadloombracelets #beadloompattern #beadwork #beadingpattern #miyuki #miyukibeads
I had tons of fun over the Easter weekend making t I had tons of fun over the Easter weekend making this rag rug sample with a kit from @raggedlife. This was part of an online workshop on rag rugging, with four other craft bloggers (hosted on Zoom by Elspeth at Ragged Life). It was brilliant! I'd highly recommend it. I've just posted about my experience on the blog - see link in bio.
Tomorrow, I'm taking part in an online rag rug wor Tomorrow, I'm taking part in an online rag rug workshop with @raggedlife! Can't wait, I've been wanting to try out rag rugging for ages. The class is being hosted on Zoom and will be fully interactive. Will post my project when I've done it!
Load More… Follow me on Instagram

Popular Posts

Popular Posts

Recent Posts

  • Craftaholique is being revived!
  • I’m back (with a new bead loom bracelet pattern)
  • Leaf Art Craft Project with Sharpie Pens
  • Chevron Tubular Peyote Bracelet Pattern
  • DIY Beadwork Storage Case (with Beading Mat)

Advert


Recent Comments

  • Hayley on BeadTool 4 Review – Make Your Own Beading Patterns
  • Susan Nicholas on BeadTool 4 Review – Make Your Own Beading Patterns
  • Heather on How I Salvaged My Tarnished Silver Pandora Bracelet
  • Hayley on DIY Beadwork Storage Case (with Beading Mat)
  • Hayley on How to Use Pinterest to Significantly Boost Your Etsy Sales

Looking for Something?

Footer

My favourite place to shop handmade!

Featured on Feedspot

Disclaimer

Craftaholique is a personal blog. The content you'll find here is for your entertainment purposes only. Craftaholique is a participant in the Amazon Services LLC Associates Program, an affiliate advertising program designed to provide a means for sites to earn advertising fees by advertising and linking to www.amazon.co.uk and www.amazon.com. Read the full site disclaimer here.

Blogroll

  • Free Pretty Things For You
  • Golden Age Beads
  • Off The Beaded Path
  • The Graphics Fairy

© 2020 Craftaholique