• Skip to primary navigation
  • Skip to main content
  • Skip to primary sidebar
  • Skip to footer
  • Home
  • Tutorials
  • Crafts
    • Jewellery Making
      • Everything jewellery
      • Beadwork
      • Wire jewellery
      • Book reviews
    • Feltmaking
    • Crochet
    • Knitting
    • Kid’s crafts
    • Book reviews
    • Other
  • Inspiration
    • Everything inspirational
    • Handmade showcase
    • Colours
    • Materials
    • Crafty Links
    • Start a Blog
  • Lifestyle
    • Tips
    • Recipes
  • About
    • Advertise
  • Contact
  • Privacy Policy
    • Cookie Policy
  • Disclaimer / Disclosure

Craftaholique

Embracing The Handmade Life | UK Craft Blog

You are here: Home / Crafts / Office Stationery Makeover! Spray Paint & Nail Polish Craft Project

January 10, 2017

Office Stationery Makeover! Spray Paint & Nail Polish Craft Project


Office Stationery Makeover! How to Spray Paint a Stapler

*Affiliate links are included in this post.

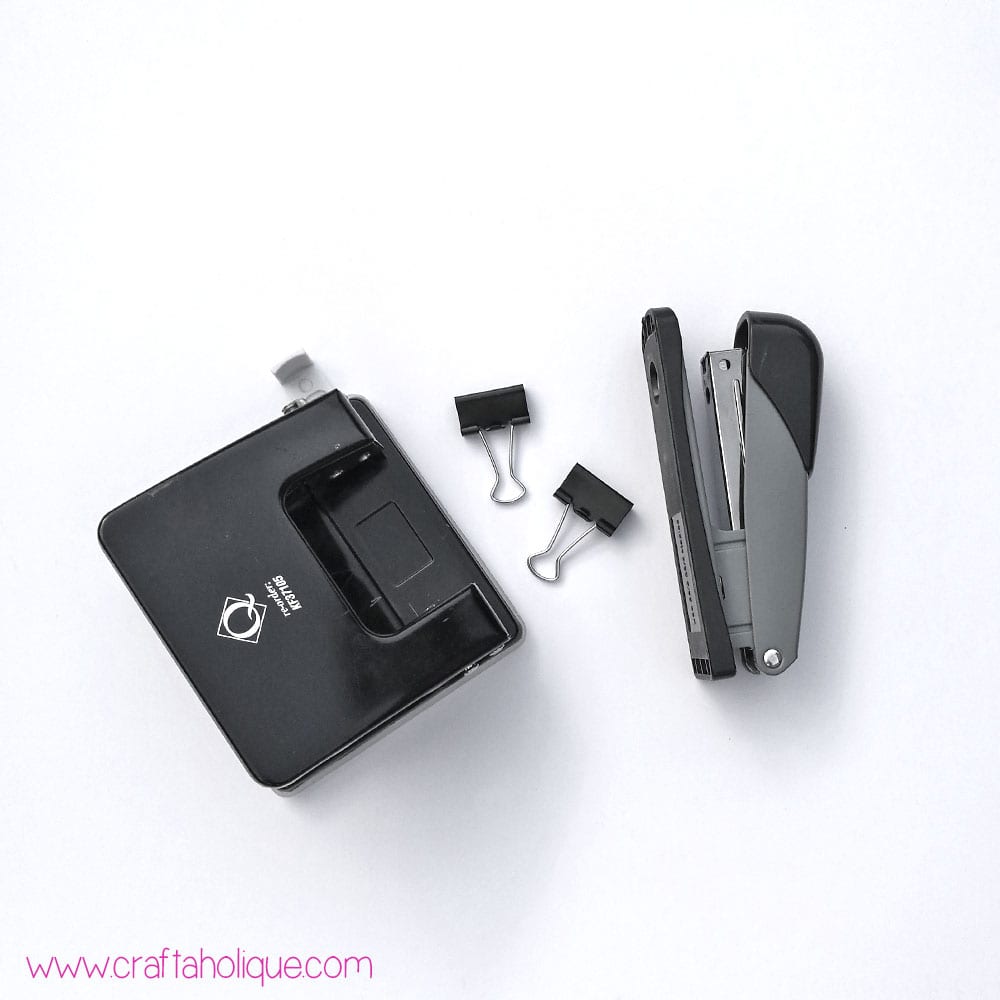
My favourite room in my home has to be my office/craft room. It’s decorated mostly in white with splashes of pink here and there. It’s my creative space and I love it! What I didn’t love so much though was my boring old stationery supplies. My paper punch, stapler and bulldog clips were as dull as ditch water and not much fun to use. I know what you’re thinking – how can office staples be fun to use anyway, right?

Well, since they’ve had a little makeover, I can definitely say that they are a lot more fun to use! I decided to spruce them up for this week’s craft tutorial, using gold spray paint and hot pink nail polish. The results are fantastic! Check out the tutorial below to find out how what I did.

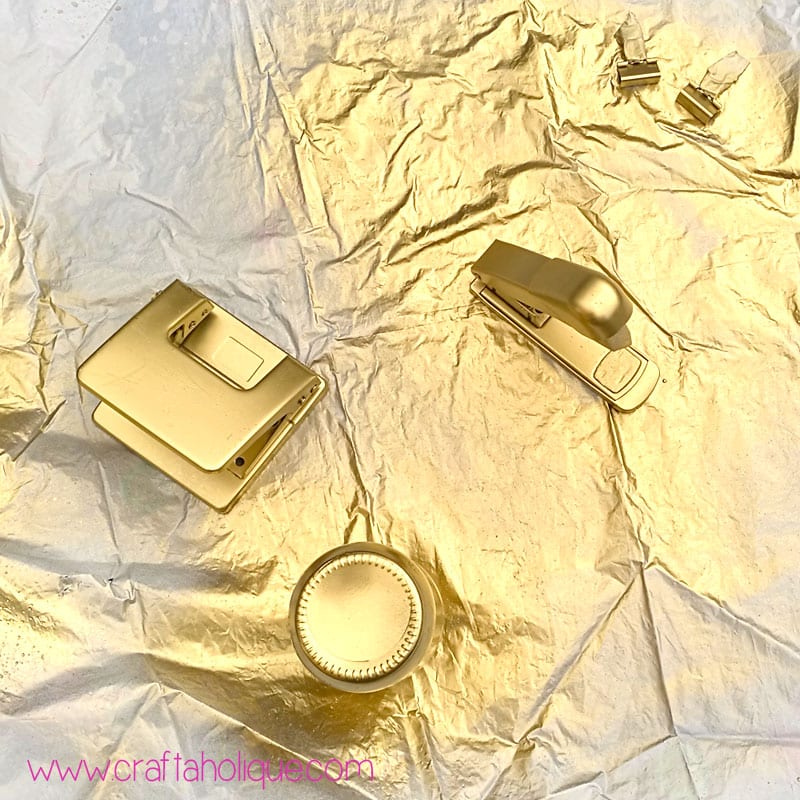
Here’s my paper punch, stapler and bulldog clips in all their former…. dullness:

Office Stationery Makeover - DIY tutorial for gold painted office supplies

And here’s what I used to turn them into luxurious desk items!

Nail polish craft project - office stationery makeover

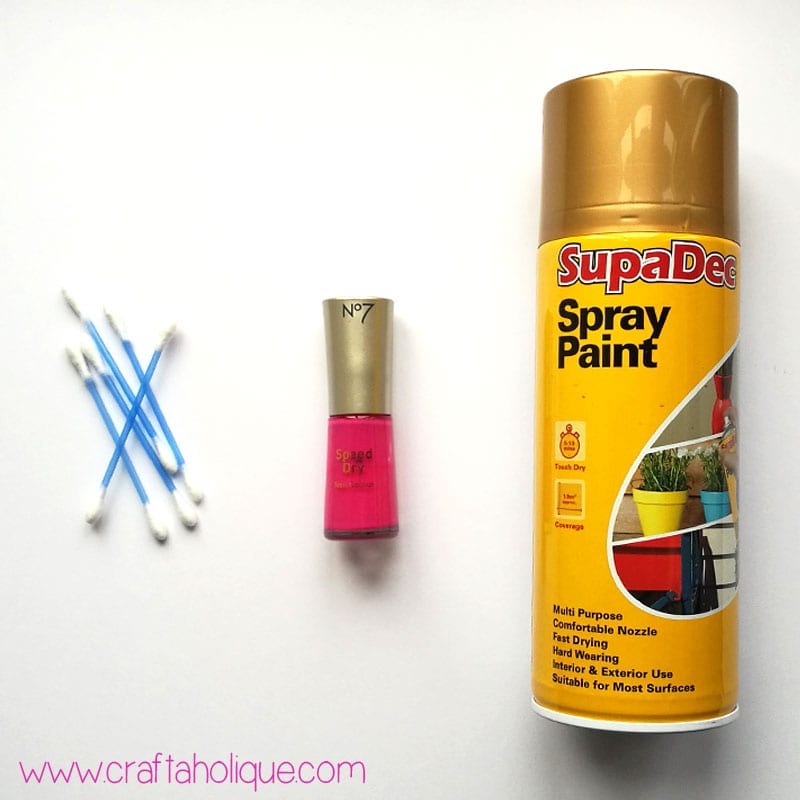
  • SupaDec Gold Spray Paint
  • Hot pink nail polish
  • Cotton buds
  • Masking tape (not shown in pic!)

Step 1

Office Stationery Makeover - DIY tutorial for gold painted office supplies

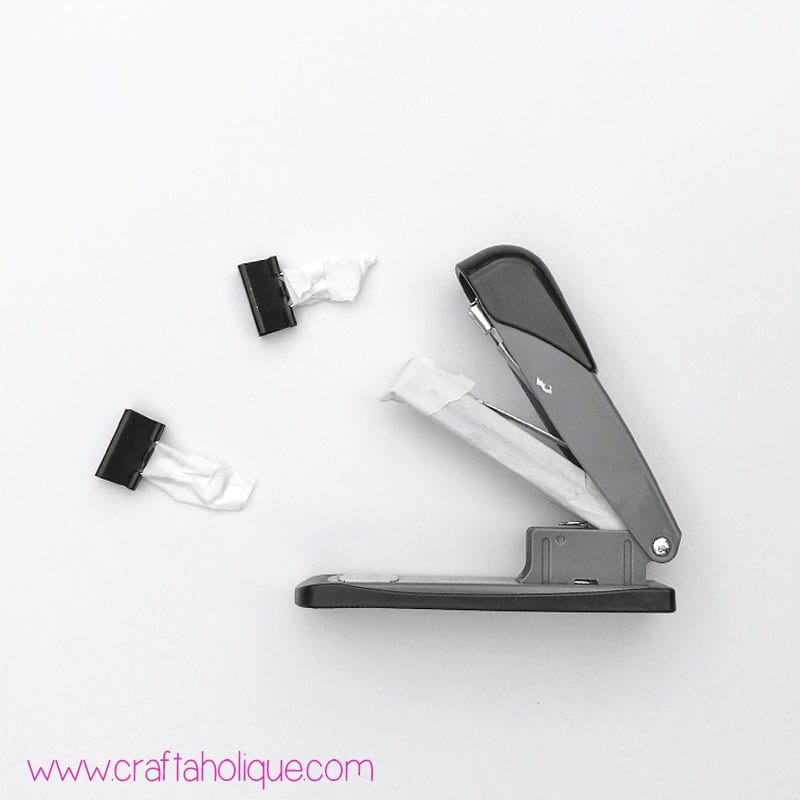
The first thing I did was to apply masking tape to any parts of the stationery that I didn’t want sprayed. I would have preferred every part of them to be coloured in gold, however, I still needed these office supplies to function! So I masked off the important parts of the stapler and bulldog clips as shown in the above photo.

Step 2

How to spray paint office suppliers - stapler, hole punch, pen pot and bulldog clips

Then I let loose with the spray can. I used Supa Dec Gold Spray Paint, as I had some leftover from the Ombre Pumpkin DIY I did last October. I used the spray paint outside, on top of an old plastic sheet, just in case. The weather wasn’t that great; it was a bit windy so the spray paint traveled a little, but luckily I managed not to spray paint the entire garden!

Step 3

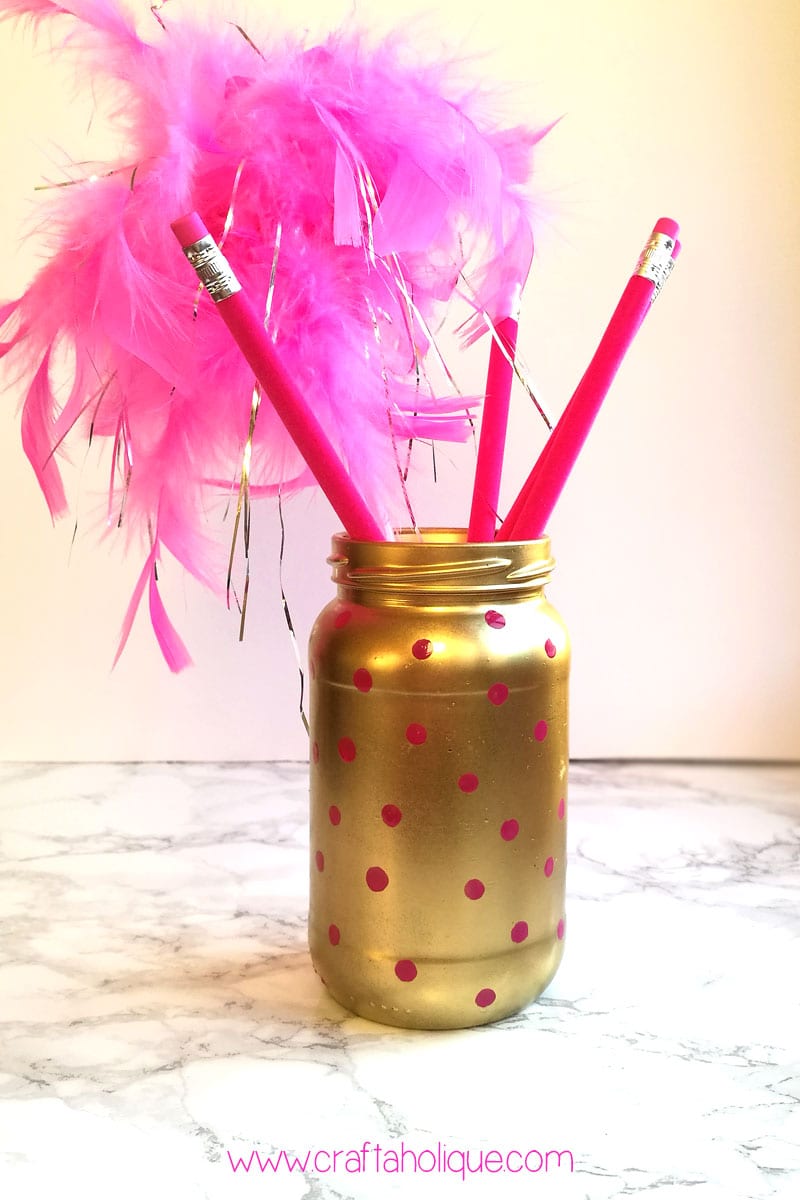
I left the first coat of spray paint to dry for around an hour before re-coating. The spray paint I used was touch dry in 10 minutes, but I needed to wait longer to apply another coat, otherwise I’d have to risk the paint peeling. Whilst I was waiting, I decided to make myself a pen pot for my desk to match! To do this, I just spray painted an old jam jar, inside and out!

Step 4

Nail polish DIY projects - how to makeover office supplies and stationery

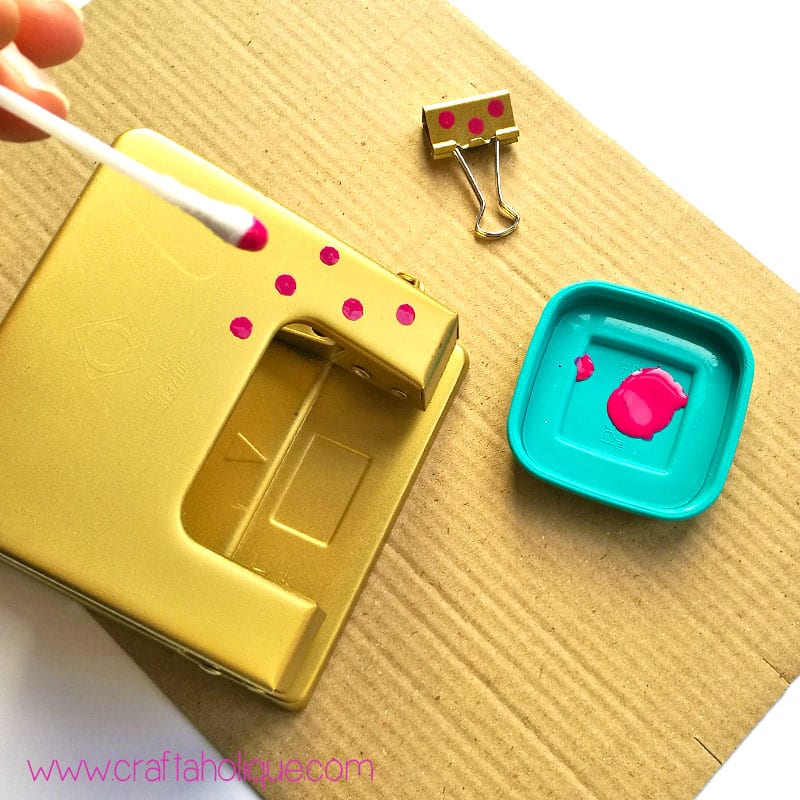
After a second coat of spray paint, I left the stationery to dry for another hour, before jazzing up further with nail polish. I’ve seen so many nail polish DIYs lately, I was just itching to try my own! I used a hot pink colour to match the accessories in my office and applied a polka dot pattern using a cotton bud!

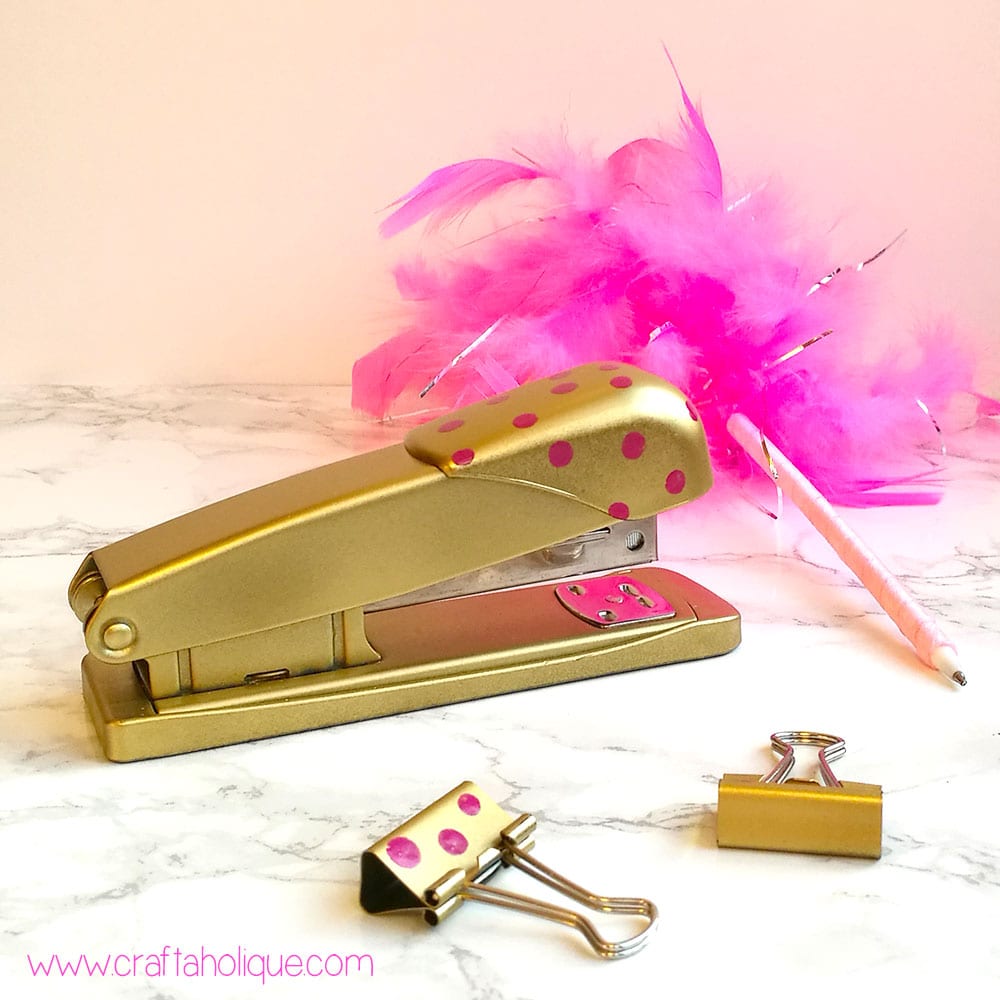
Here are the finished results!

Nail polish project - how to makeover a hole punch and stapler - with spray paint!

Nail polish project DIY pen pot holder using a jam jar

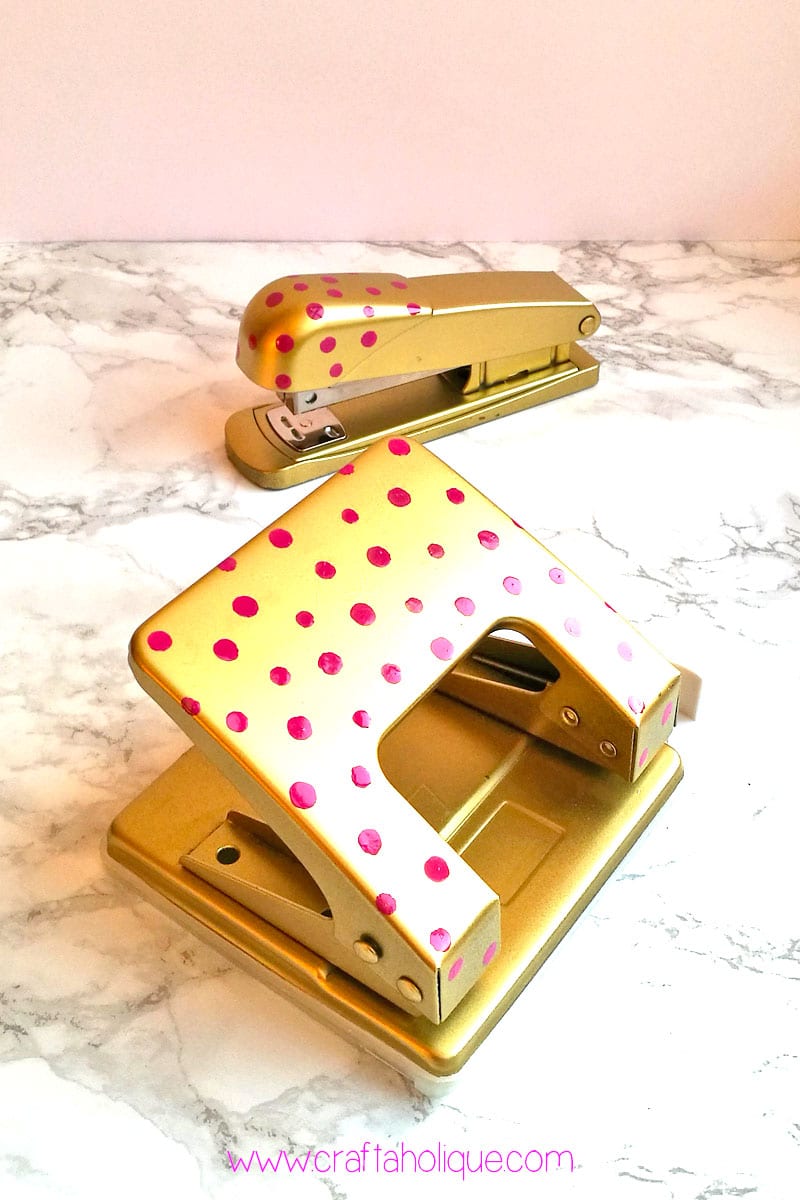
I’m so pleased with the way my office stationery makeover turned out. I managed to turn them all from dull desk eyesores into something way more glamorous! I hope you like them and that you enjoyed this tutorial!

Please take a minute to share this post online. Thank you!

*Affiliate links to eBay and Amazon are included in this post. Craftaholique is a participant in the Amazon Services LLC Associates Program, an affiliate advertising program designed to provide a means for sites to earn advertising fees by advertising and linking to www.amazon.co.uk and www.amazon.com.


Before you go, why not check out these posts below:

  • Halloween DIY – No Carve Glitzy Pumpkins
  • How to Make a Felt Owl Mobile Phone Case
  • How to Make Sparkly Beaded Flowers

Office Stationery Makeover! How to jazz up your stapler, hole punch etc with spray paint and nail polish

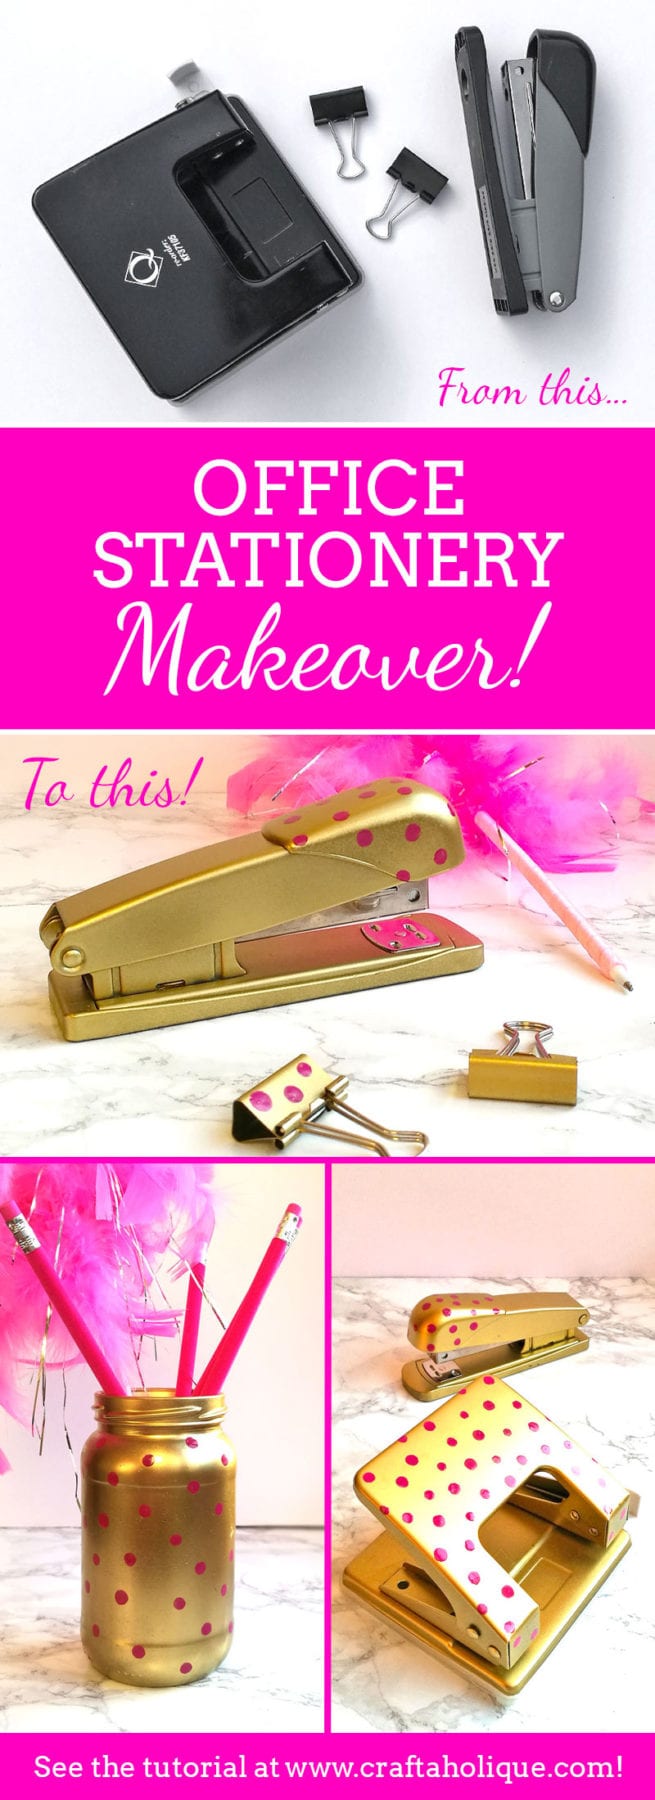
*Image source – all images are owned by Craftaholique. Please contact me if you’d like to use my images on your website.

Epic Mommy Adventures

Share this post!
  • save 
  • share 
  • tweet 
  • email 

Filed Under: Crafts, Other, Tutorials Hayley 5 Comments

Reader Interactions

Tutorial – How to Make a Beaded Flower Ring
Handmade Showcase: Amazing Disney Princess Dresses

Comments

  1. 1

    Margot says

    February 16, 2017 at 2:06 pm

    This is such a clever idea! I may try this on my boring old stapler 🙂

    Reply
    • 2

      Hayley says

      February 16, 2017 at 6:06 pm

      Thank you! It’s amazing what a difference a stapler makeover can do for your office desk!

      Reply
  2. 3

    Polish Perfect says

    October 13, 2017 at 2:12 am

    I’ve been searching a lot of ways to use my old nail polish and this will definitely on my list. Making my office desk a little bit brighter and colorful.

    Reply
    • 4

      Hayley says

      October 13, 2017 at 2:00 pm

      Glad you liked this post! It’s good to have a few bright and cheerful desk accessories to look at when working! Thanks for stopping by and commenting Lynda.

      Reply

Trackbacks

  1. 15 Unexpected Tricks You Never Knew You Can Do With Nail Polish ! – Virally Feeds says:
    December 8, 2017 at 8:46 am

    […] Craftaholique […]

    Reply

Leave a Reply Cancel reply

Your email address will not be published.

Primary Sidebar

Connect

  • E-mail
  • Facebook
  • Instagram
  • Pinterest
  • Twitter

Advert


Instagram

I finally finished this bead loom bracelet! Starte I finally finished this bead loom bracelet! Started it before the first lockdown... I think I lost my mojo for a while! So this is a flat piece of beadwork, which I then glued onto a cuff bracelet blank.
Started this loom beading project last May... Prou Started this loom beading project last May... Proud to say I finally finished it more than one year later! More photos coming soon! What's your longest ever project? #beads #beadwork #loombeading #crafts #crafting #craftblogger #crafty #longestprojectever
My latest beaded creation! Peyote with a twist. Lo My latest beaded creation! Peyote with a twist. Love the chunkiness of it and how it shimmers with the galvanised silver Miyuki Delica beads. #beads #beadwork #beadweavingpeyote #peyote #flatpeyotestitch #silver #beaded #beadedjewelryofinstagram #beadedring #beadedjewelry #miyukidelica #miyukipeyote #miyuki #miyukibeads #beading #crafts #crafting #craftblogger
My latest tubular peyote bracelet! It's made up of My latest tubular peyote bracelet! It's made up of hundreds of tiny Miyuki Delica beads in vibrant colours of metallic blue, silver, white and pink. The pattern is available in my Etsy shop, Craftaholique Designs. #beads #beadwork #beadweavingpeyote #tubularpeyotestitch #miyukipeyote #beading #beadingpattern #etsyshop #etsysellersofinstagram #etsyseller #etsyshopowner #bracelets #vibrant #tubularpeyote #beadaddict #beadaddiction #miyuki #miyukibeads
My finished bead embroidery - I've used it as an e My finished bead embroidery - I've used it as an embellishment for a beadwork storage case I've just made. I upcycled the case from an old padfolio / conference folder. Inside there's an integrated beading mat where I can do my beadwork - no more beads rolling away! I've posted a tutorial on my blog (link in bio).
My latest project... Bead embroidered flowers! I'm My latest project... Bead embroidered flowers! I'm making this as an embellishment for something. Will post the final project pic soon! #beadwork #beadembroidery #embroidery #embroiderydesign #embroideryart #embroidelicious #flowers #beads #beadedembroidery #beadedembellishment #crafts #crafting #keepcraftingcarryon #keepcraftalive #keepcraftingandcarryon #beaded #beadaddict #beadaddiction #embroideryhoop #craftblogger #crafty
Just finished this set of Miyuki Delica bracelets Just finished this set of Miyuki Delica bracelets in pretty colours of peach, white, pink and gold! I made the two diamond pattern bracelets using a bead loom. The single strand bracelet I just strung together. What do you think to my creation? #beads #beadwork #beadloom #beadloompattern #beadloomingbracelet #beadlooming #beadloombracelets #beadweaving #loombeading #loombead #beadingpattern #beadedjewelryofinstagram #beadaddict #beadaddiction #miyuki #miyukibeads #miyukidelica #crafts #crafting #craftblogger #crafty #bead #craftblogger #beadedbracelets #cuffbracelet #stackingbracelets
Though I've been beading for many years, this is t Though I've been beading for many years, this is the first time I've used a bead loom! It's pretty straightforward and quicker than peyote. #beading #beadloom #beadlooming #beadloomingbracelet #beadloomingnewbie #beadloombracelets #beadloompattern #beadwork #beadingpattern #miyuki #miyukibeads
I had tons of fun over the Easter weekend making t I had tons of fun over the Easter weekend making this rag rug sample with a kit from @raggedlife. This was part of an online workshop on rag rugging, with four other craft bloggers (hosted on Zoom by Elspeth at Ragged Life). It was brilliant! I'd highly recommend it. I've just posted about my experience on the blog - see link in bio.
Tomorrow, I'm taking part in an online rag rug wor Tomorrow, I'm taking part in an online rag rug workshop with @raggedlife! Can't wait, I've been wanting to try out rag rugging for ages. The class is being hosted on Zoom and will be fully interactive. Will post my project when I've done it!
I've needed a bit of colour in my life recently, a I've needed a bit of colour in my life recently, after the last few weeks of darkness. I made this bangle using tubular peyote stitch, with Miyuki Delica beads. Pattern available in my Etsy Shop, Craftaholique Designs!
If you're stuck for what to get your mum this Moth If you're stuck for what to get your mum this Mother's Day, I've put together an Etsy gift guide on my blog that you might like (link in bio). Etsy is my go-to place for gifts as you can find some really creative and unique products, plus it's a great way to support the handmade community! Featuring these amazing Etsy sellers... @pawprintillustration @kustomproductsinc @jemmamarston_design @butterflyandtoadstool @bonnenouvelle_uk @silveristicjewelry @crystalfiligree
Load More… Follow me on Instagram

Popular Posts

Popular Posts

Recent Posts

  • I’m back (with a new bead loom bracelet pattern)
  • Leaf Art Craft Project with Sharpie Pens
  • Chevron Tubular Peyote Bracelet Pattern
  • DIY Beadwork Storage Case (with Beading Mat)
  • Set of Two Bead Loom Bracelet Patterns

Advert


Recent Comments

  • Christina Athanasuleas on I’m back (with a new bead loom bracelet pattern)
  • Hayley on Beadwork Tutorial! Learn Flat Odd and Even Count Peyote Stitch
  • Jasmine on How I Salvaged My Tarnished Silver Pandora Bracelet
  • Lindsey Parry on How I Salvaged My Tarnished Silver Pandora Bracelet
  • Monica Shaw on Beadwork Tutorial! Learn Flat Odd and Even Count Peyote Stitch

Looking for Something?

Footer

My favourite place to shop handmade!

Featured on Feedspot

Disclaimer

Craftaholique is a personal blog. The content you'll find here is for your entertainment purposes only. Craftaholique is a participant in the Amazon Services LLC Associates Program, an affiliate advertising program designed to provide a means for sites to earn advertising fees by advertising and linking to www.amazon.co.uk and www.amazon.com. Read the full site disclaimer here.

Blogroll

  • Free Pretty Things For You
  • Golden Age Beads
  • Off The Beaded Path
  • The Graphics Fairy

© 2020 Craftaholique

We use cookies on our website to give you the most relevant experience by remembering your preferences and repeat visits. By clicking “Accept All”, you consent to the use of ALL the cookies. However, you may visit "Cookie Settings" to provide a controlled consent.
Cookie SettingsAccept All
Manage consent

Privacy Overview

This website uses cookies to improve your experience while you navigate through the website. Out of these, the cookies that are categorized as necessary are stored on your browser as they are essential for the working of basic functionalities of the website. We also use third-party cookies that help us analyze and understand how you use this website. These cookies will be stored in your browser only with your consent. You also have the option to opt-out of these cookies. But opting out of some of these cookies may affect your browsing experience.
Necessary
Always Enabled
Necessary cookies are absolutely essential for the website to function properly. This category only includes cookies that ensures basic functionalities and security features of the website. These cookies do not store any personal information.
Non-necessary
Any cookies that may not be particularly necessary for the website to function and is used specifically to collect user personal data via analytics, ads, other embedded contents are termed as non-necessary cookies. It is mandatory to procure user consent prior to running these cookies on your website.
SAVE & ACCEPT