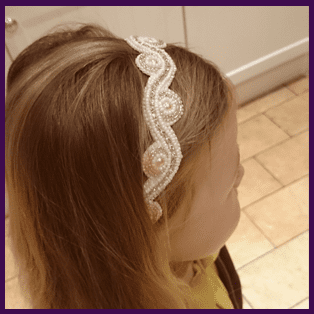
 Over Christmas I found a little time to indulge in some beading again… and I realised how much I’ve missed it! I started learning about bead embroidery as I’m pretty fascinated by sewing together tiny little beads to make something really beautiful. I came across an amazing tutorial for a bead embroidered headband on YouTube by Megan Petersen, the owner of Megan’s Beaded Designs. I just HAD to attempt make a child’s version for my little girl!
First of all I measured out the length of fabric I’d need for my daughter and cut a strip roughly to size leaving plenty of room just in case. As this was my first time doing bead embroidery, I had to find a good beading foundation and for some reason Lacy’s Stiff Stuff doesn’t seem to be readily available here in the UK! I ended up using some kind of thick white coarse fabric to stitch my beads onto (which the customer service rep in Hobbycraft said would do the trick). I used white felt for the back.
I used acrylic flat back pink pearls, a string of sparkly diamante rhinestones and a selection of size 11/0 seed beads in pink and white as embellishments for my bead embroidered headband. I used a white nylon beading thread and a size 10 beading needle.
I followed the instructions in Megan’s tutorial to put together a layout for my piece and then sewed the beads on. I learned a few important bead embroidery lessons during this project! Firstly, the material I used is not great as the white coarse fabric I used as my beading foundation is definitely not the right stuff. It does tend to fray.
Secondly, I used way too much glue to stick my pearls and diamante rhinestones on, so that it seeped outside the gems onto the sections where I needed to sew on my seed beads. That was a problem because it was incredibly hard to get my beading needle through the fabric at times and I broke two along the way!
Lastly, I made some of my curves too “steep” in places if that makes sense. It was hard to trim the fabric once I’d finished my beading because the scissors wouldn’t fit properly into the curves without causing major damage to some of the beads, so I ended up with a few gaps here and there. Amazingly, I managed not to cut my thread by accident!
Once I finished sewing my beads onto the foundation and had trimmed it to size, I glued some ribbon onto the back of the foundation fabric and then glued my felt on top of the ribbon. I trimmed the felt to size and finished the piece off by sealing the foundation and backing together with a blanket stitch to form a beaded edge.
 It took me a good 12 hours all in all to complete this bead embroidered headband piece and I thoroughly enjoyed making it. I’m really happy with the end result and my little girl feels like a princess wearing it! The fact that it’s felt backed helps stop the headband from slipping, not to mention making it really comfortable. It ties underneath her hair.
If you’re interested in making a bead embroidered headband, I recommend you check out Megan’s tutorial, it’s easy to follow and is great for a beginner to intermediate level beader. I’d love to hear what you think, so please feel free to leave a comment below!
Images © Craftaholique.


Leave a Reply