• Skip to primary navigation
  • Skip to main content
  • Skip to primary sidebar
  • Skip to footer
  • Home
  • Tutorials
  • Crafts
    • Jewellery Making
      • Everything jewellery
      • Beadwork
      • Wire jewellery
      • Book reviews
    • Feltmaking
    • Crochet
    • Knitting
    • Kid’s crafts
    • Book reviews
    • Other
  • Inspiration
    • Everything inspirational
    • Handmade showcase
    • Colours
    • Materials
    • Crafty Links
    • Start a Blog
  • Lifestyle
    • Tips
    • Recipes
  • About
    • Advertise
  • Contact
  • Privacy Policy
    • Cookie Policy
  • Disclaimer / Disclosure

Craftaholique

Embracing The Handmade Life | UK Craft Blog

You are here: Home / Jewellery making / DIY Party Jewellery: How to Make a Multi Strand Sparkly Rhinestone Bracelet

November 15, 2016

DIY Party Jewellery: How to Make a Multi Strand Sparkly Rhinestone Bracelet

How to Make a Bling Multi Strand Bracelet - DIY Party Jewellery

*Affiliate links are included in this post.

The weeks leading up to Christmas are hurtling by and party season is just about upon us! Why not make your own little piece of bling to accompany your outfit this year? This multi strand sparkly rhinestone bracelet looks like it’s worth a million dollars, yet you could make it for a fraction of that. This is a quick project that you can make in around 30 minutes, once you’ve gathered your materials!

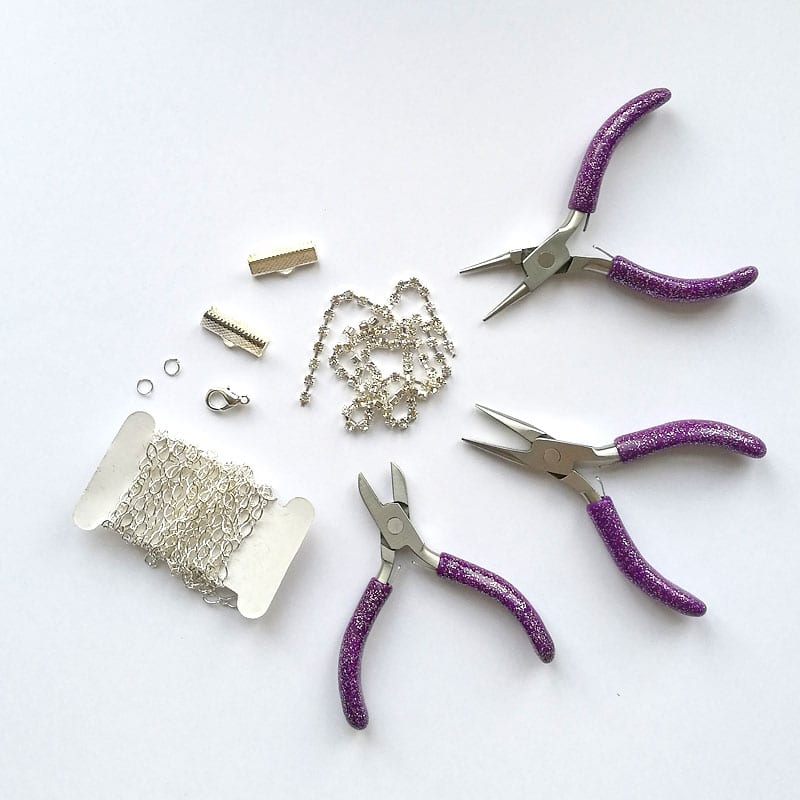
To make this multi strand bracelet, you’ll need the following materials:

  • Rhinestone cupchain
  • 2 x 20mm flat ribbon ends with loop
  • Silver plated chain
  • Silver plated jump rings
  • Silver plated clasp
  • Gemstone glue or E6000
  • Jewellery pliers (wire cutters, flat nose pliers and round nose pliers)
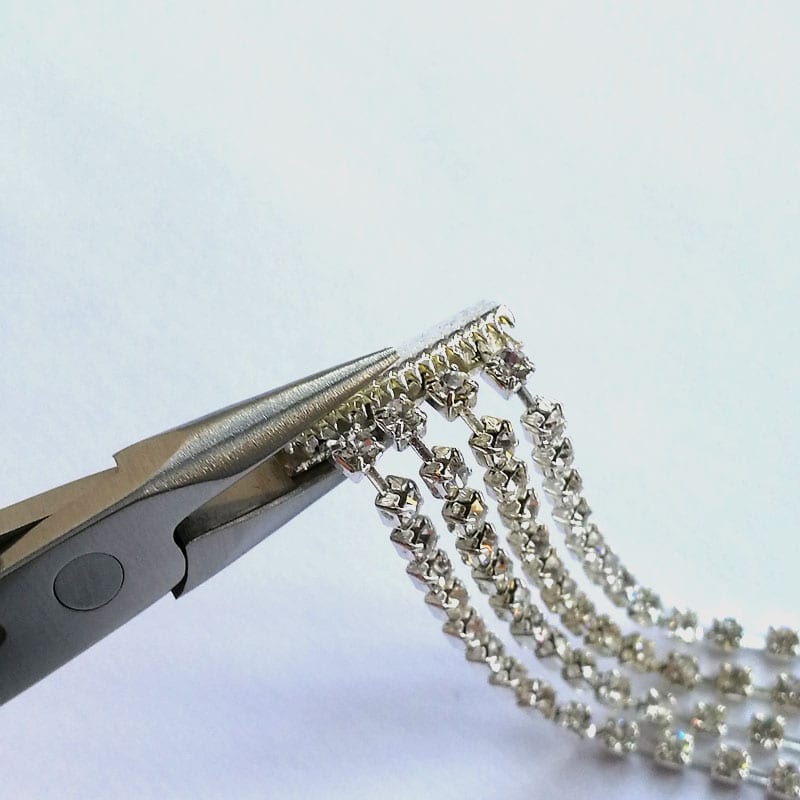
How to make a multi strand bracelet with flat ribbon ends

Step 1

How to make a multi strand bracelet with flat ribbon ends

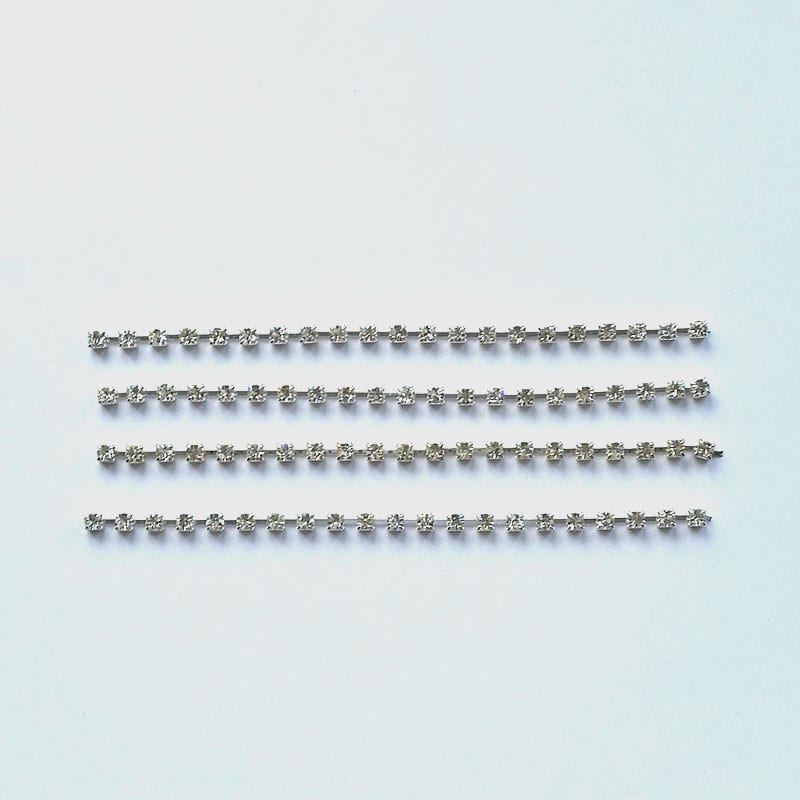
Measure three quarters of the way around your wrist and trim off four pieces of rhinestone cupchain in exactly the same length as shown above.

Step 2

How to make a multi strand bracelet using rhinestone cupchain

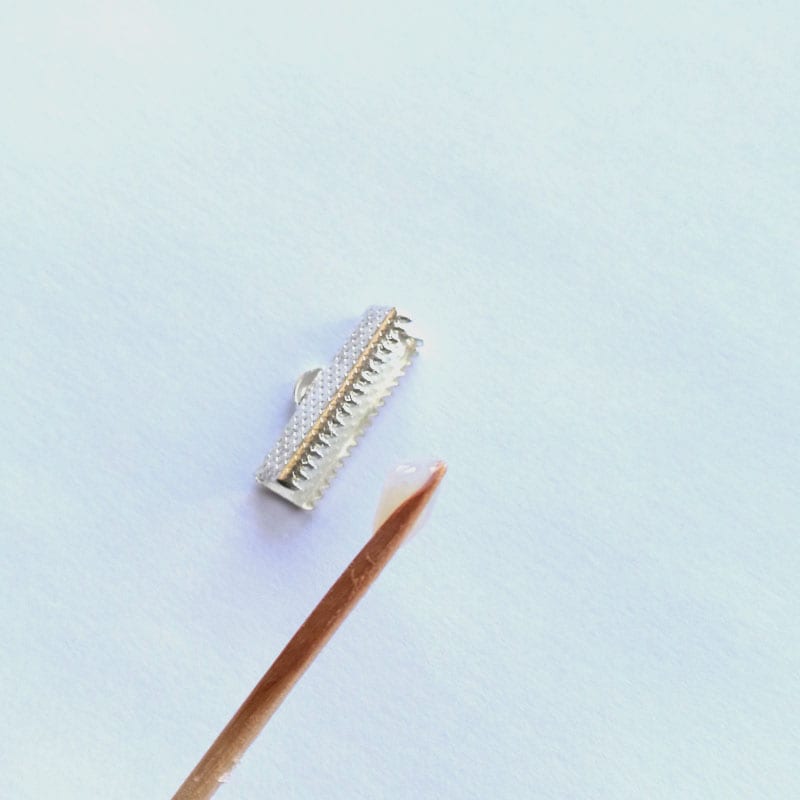
You could make this bracelet without the use of gemstone glue but it would be extremely fiddly. Using glue inside the flat ribbon ends will help to keep your rhinestone strands in place whilst you flatten the teeth into place. So use a cocktail stick and dab a little glue inside the flat ribbon ends as shown above.

Step 3

How to make a multi strand bracelet using rhinestone cupchain

Carefully place your rhinestone cupchain into the flat ribbon ends, making sure to keep the strands nice and even. You may want to use your round nose pliers to help you with getting the strands into the right place. Let the glue dry for at least 15 minutes before moving onto the next step!

Step 4

DIY Party Jewellery - Sparkly Multi Strand Bracelet Project using Flat Ribbon Ends and Cup Chain

When the glue has dried, you can flatten the ribbon ends with your flat nose pliers. Don’t be too forceful with the ribbon ends though as you might crush the rhinestones inside.

Step 5

DIY Party Jewellery - Sparkly Multi Strand Bracelet Project using Flat Ribbon Ends and Cup Chain

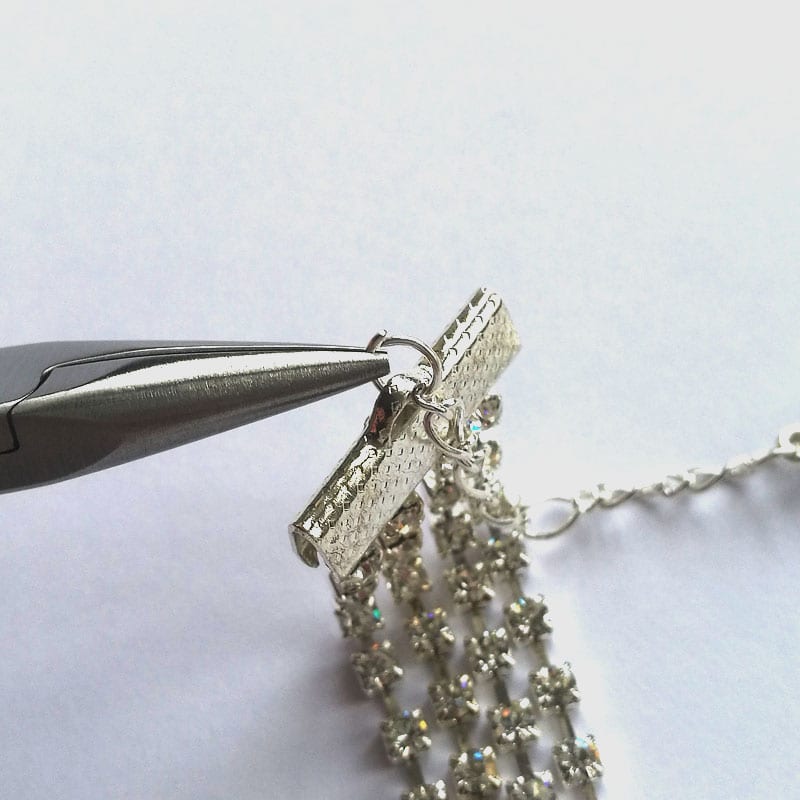
Finally, add a jump ring to the flat ribbon end loops and then add a chain to each jump ring. You could make one piece of chain longer on one side to form an extender chain, which looks really pretty. Add a clasp to the shorter end. You can attach all of your findings with your jewellery pliers.

Step 6

How to make a multi strand bracelet using rhinestone cupchain and flat ribbon ends - DIY party jewellery

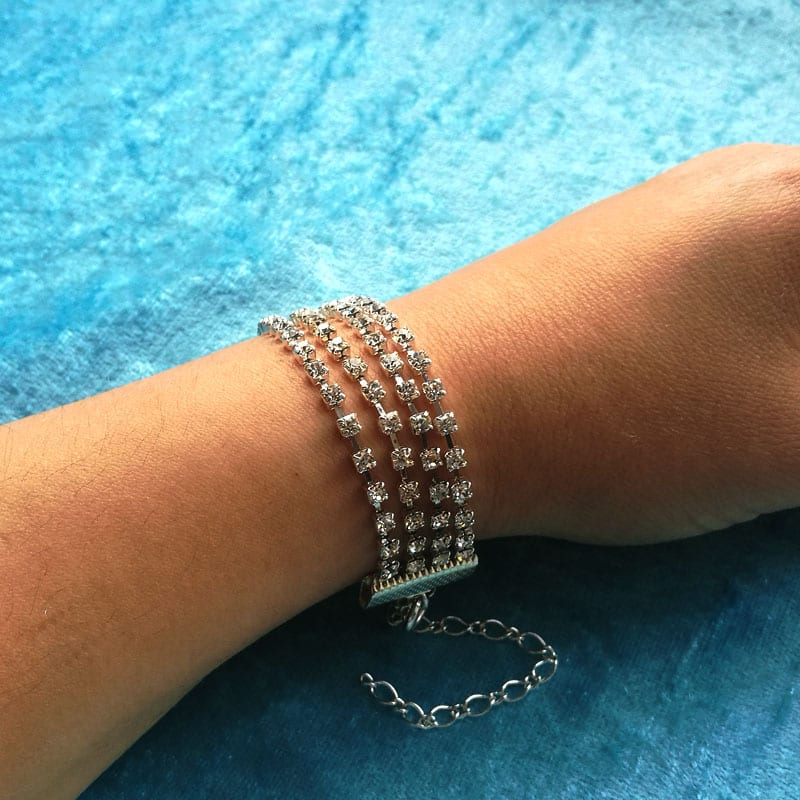
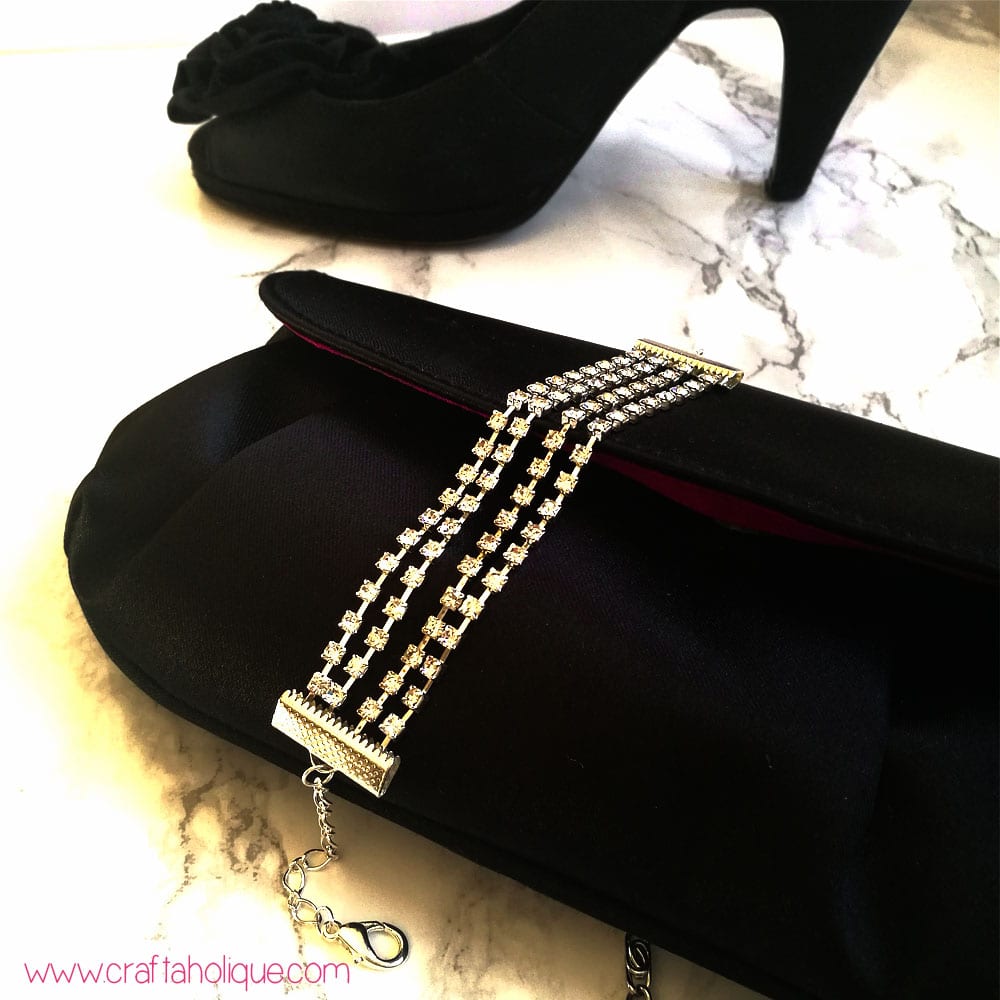
When complete, your multi strand bracelet should look something like mine in the above photo! Why not use wider flat ribbon ends and more strands of cupchain for a really dramatic effect?

I hope you enjoyed this tutorial! If you did, please take a moment to share this post with your followers online – and please subscribe for future blog updates!

*Affiliate links to Etsy are included in this post. This means that if you make a purchase through one of my links, I will earn a small commission at no cost to you. I only ever recommend products that I think are great and any commissions help me to keep this site up and running. Thank you for using my links if you’re able to.

How to make a multi strand bracelet using rhinestone cupchain and flat ribbon ends - DIY party jewellery

*Images are the copyright of Craftaholique.

Share this post!
  • save 
  • share 
  • tweet 
  • email 

Filed Under: Jewellery making, Tutorials Hayley 1 Comment

Reader Interactions

How to Make a Felt Owl Mobile Phone Case
14 Christmas Gifts That Beaders & Jewellery Makers Will Love

Comments

  1. 1

    Katrina says

    February 20, 2019 at 12:28 am

    Fantastic! I have some more elaborate trim that I want to try. I want to make it for my daughters wedding.

    Reply

Leave a Reply Cancel reply

Your email address will not be published. Required fields are marked *

Primary Sidebar

Welcome!

Welcome!

Hi, I'm Hayley! Thanks for visiting Craftaholique, my little corner of the internet where I blog about crafts, beading, handmade products and lots of other stuff relating to creativity. Stay a while and have a browse!

Connect

  • E-mail
  • Facebook
  • Instagram
  • Pinterest
  • Twitter

Advert


Instagram

Work in progress! A new pattern I'm working on. Lo Work in progress! A new pattern I'm working on. Loving the metallic green colour. 😍 #beads #beadwork #peyote #bracelets #braceletpattern #peyotestitch #jewellerymaking #crafts #crafting
Hi all! It's been a very long time since I've post Hi all! It's been a very long time since I've posted here. I've been working on a new venture - surface pattern design. This is my first attempt at a seamless pattern. It's part of a collection I'm working on called 'Mum's Garden'. Mum loved hedgehogs, and they always frequented her garden to enjoy the food she put out for them. 😍 Honest opinions! What do you think? Could this work for wrapping paper, notebook covers, etc? Thanks for looking! #surfacepatterndesign #creativebusiness #creativeentrepreneur #graphicdesign #digitalart #hedgehogs #patterns #seamlesspattern
I finally finished this bead loom bracelet! Starte I finally finished this bead loom bracelet! Started it before the first lockdown... I think I lost my mojo for a while! So this is a flat piece of beadwork, which I then glued onto a cuff bracelet blank.
Started this loom beading project last May... Prou Started this loom beading project last May... Proud to say I finally finished it more than one year later! More photos coming soon! What's your longest ever project? #beads #beadwork #loombeading #crafts #crafting #craftblogger #crafty #longestprojectever
My latest beaded creation! Peyote with a twist. Lo My latest beaded creation! Peyote with a twist. Love the chunkiness of it and how it shimmers with the galvanised silver Miyuki Delica beads. #beads #beadwork #beadweavingpeyote #peyote #flatpeyotestitch #silver #beaded #beadedjewelryofinstagram #beadedring #beadedjewelry #miyukidelica #miyukipeyote #miyuki #miyukibeads #beading #crafts #crafting #craftblogger
My latest tubular peyote bracelet! It's made up of My latest tubular peyote bracelet! It's made up of hundreds of tiny Miyuki Delica beads in vibrant colours of metallic blue, silver, white and pink. The pattern is available in my Etsy shop, Craftaholique Designs. #beads #beadwork #beadweavingpeyote #tubularpeyotestitch #miyukipeyote #beading #beadingpattern #etsyshop #etsysellersofinstagram #etsyseller #etsyshopowner #bracelets #vibrant #tubularpeyote #beadaddict #beadaddiction #miyuki #miyukibeads
My finished bead embroidery - I've used it as an e My finished bead embroidery - I've used it as an embellishment for a beadwork storage case I've just made. I upcycled the case from an old padfolio / conference folder. Inside there's an integrated beading mat where I can do my beadwork - no more beads rolling away! I've posted a tutorial on my blog (link in bio).
My latest project... Bead embroidered flowers! I'm My latest project... Bead embroidered flowers! I'm making this as an embellishment for something. Will post the final project pic soon! #beadwork #beadembroidery #embroidery #embroiderydesign #embroideryart #embroidelicious #flowers #beads #beadedembroidery #beadedembellishment #crafts #crafting #keepcraftingcarryon #keepcraftalive #keepcraftingandcarryon #beaded #beadaddict #beadaddiction #embroideryhoop #craftblogger #crafty
Just finished this set of Miyuki Delica bracelets Just finished this set of Miyuki Delica bracelets in pretty colours of peach, white, pink and gold! I made the two diamond pattern bracelets using a bead loom. The single strand bracelet I just strung together. What do you think to my creation? #beads #beadwork #beadloom #beadloompattern #beadloomingbracelet #beadlooming #beadloombracelets #beadweaving #loombeading #loombead #beadingpattern #beadedjewelryofinstagram #beadaddict #beadaddiction #miyuki #miyukibeads #miyukidelica #crafts #crafting #craftblogger #crafty #bead #craftblogger #beadedbracelets #cuffbracelet #stackingbracelets
Though I've been beading for many years, this is t Though I've been beading for many years, this is the first time I've used a bead loom! It's pretty straightforward and quicker than peyote. #beading #beadloom #beadlooming #beadloomingbracelet #beadloomingnewbie #beadloombracelets #beadloompattern #beadwork #beadingpattern #miyuki #miyukibeads
I had tons of fun over the Easter weekend making t I had tons of fun over the Easter weekend making this rag rug sample with a kit from @raggedlife. This was part of an online workshop on rag rugging, with four other craft bloggers (hosted on Zoom by Elspeth at Ragged Life). It was brilliant! I'd highly recommend it. I've just posted about my experience on the blog - see link in bio.
Tomorrow, I'm taking part in an online rag rug wor Tomorrow, I'm taking part in an online rag rug workshop with @raggedlife! Can't wait, I've been wanting to try out rag rugging for ages. The class is being hosted on Zoom and will be fully interactive. Will post my project when I've done it!
Load More… Follow me on Instagram

Popular Posts

Popular Posts

Recent Posts

  • Craftaholique is being revived!
  • I’m back (with a new bead loom bracelet pattern)
  • Leaf Art Craft Project with Sharpie Pens
  • Chevron Tubular Peyote Bracelet Pattern
  • DIY Beadwork Storage Case (with Beading Mat)

Advert


Recent Comments

  • Hayley on BeadTool 4 Review – Make Your Own Beading Patterns
  • Susan Nicholas on BeadTool 4 Review – Make Your Own Beading Patterns
  • Heather on How I Salvaged My Tarnished Silver Pandora Bracelet
  • Hayley on DIY Beadwork Storage Case (with Beading Mat)
  • Hayley on How to Use Pinterest to Significantly Boost Your Etsy Sales

Looking for Something?

Footer

My favourite place to shop handmade!

Featured on Feedspot

Disclaimer

Craftaholique is a personal blog. The content you'll find here is for your entertainment purposes only. Craftaholique is a participant in the Amazon Services LLC Associates Program, an affiliate advertising program designed to provide a means for sites to earn advertising fees by advertising and linking to www.amazon.co.uk and www.amazon.com. Read the full site disclaimer here.

Blogroll

  • Free Pretty Things For You
  • Golden Age Beads
  • Off The Beaded Path
  • The Graphics Fairy

© 2020 Craftaholique