• Skip to primary navigation
  • Skip to main content
  • Skip to primary sidebar
  • Skip to footer
  • Home
  • Tutorials
  • Crafts
    • Jewellery Making
      • Everything jewellery
      • Beadwork
      • Wire jewellery
      • Book reviews
    • Feltmaking
    • Crochet
    • Knitting
    • Kid’s crafts
    • Book reviews
    • Other
  • Inspiration
    • Everything inspirational
    • Handmade showcase
    • Colours
    • Materials
    • Crafty Links
    • Start a Blog
  • Lifestyle
    • Tips
    • Recipes
  • About
    • Advertise
  • Contact
  • Privacy Policy
    • Cookie Policy
  • Disclaimer / Disclosure

Craftaholique

Embracing The Handmade Life | UK Craft Blog

You are here: Home / Tutorials / How to bezel set a rivoli with seed beads

March 15, 2020

How to bezel set a rivoli with seed beads

How to create a beaded bezel for a crystal rivoli.

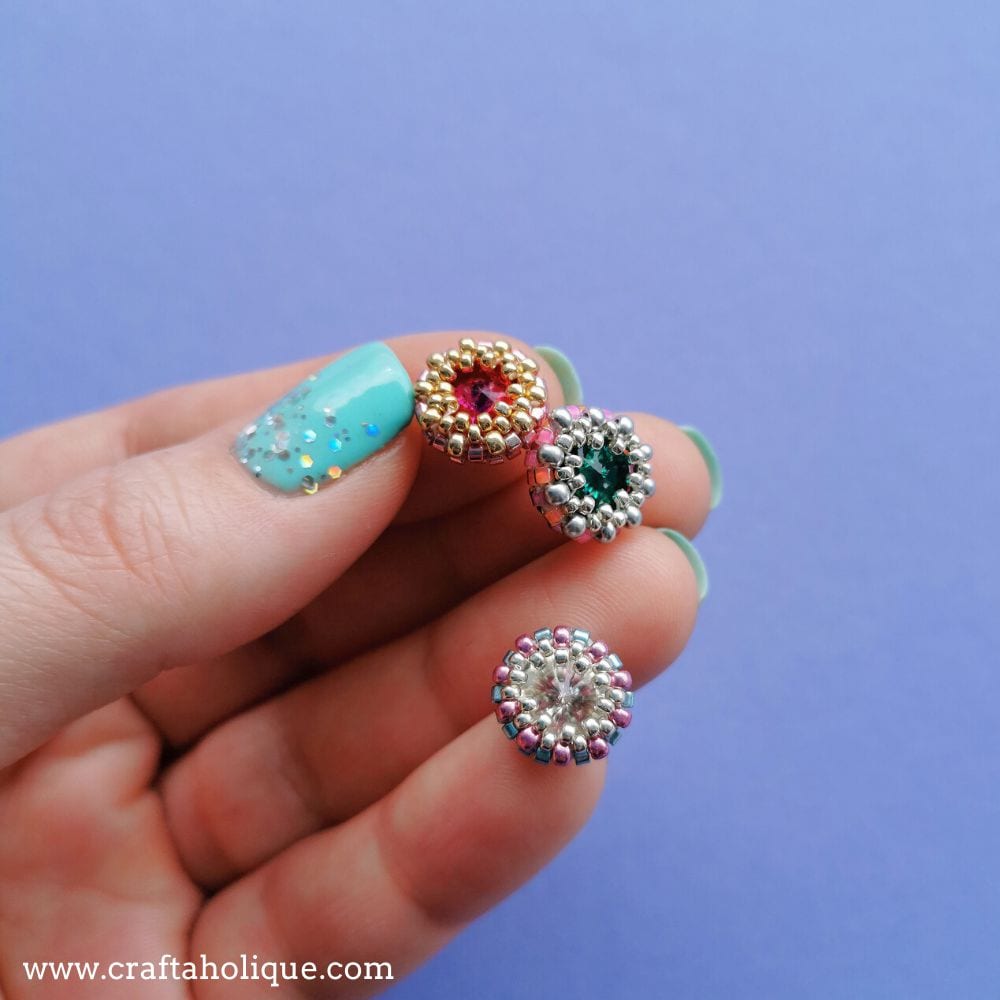
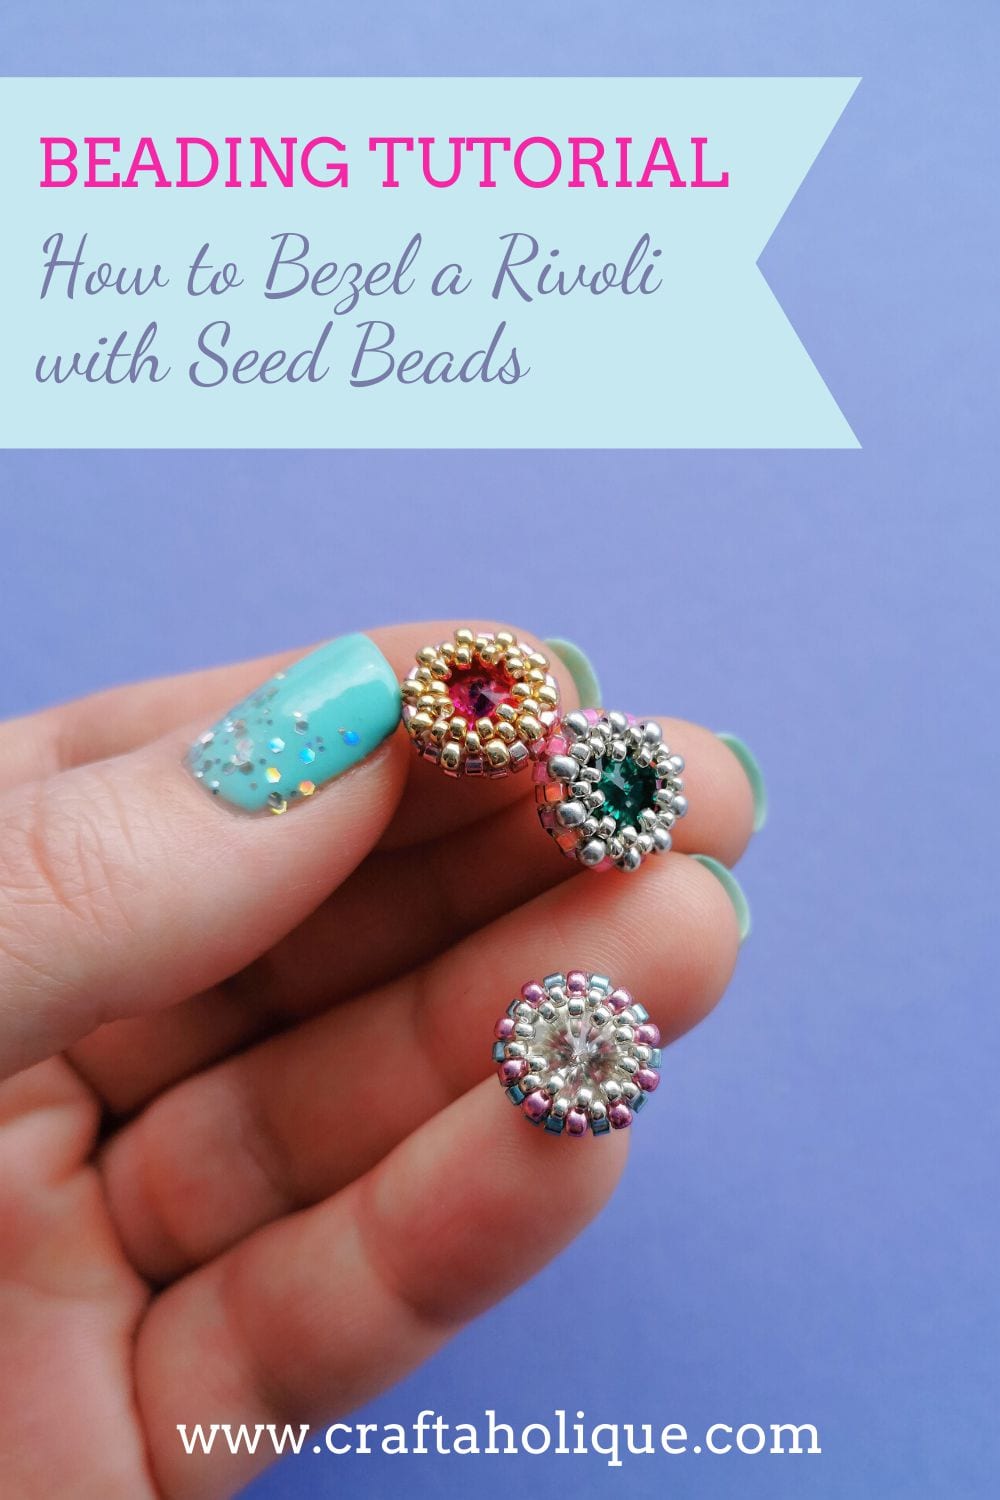
In this post, I’ll be showing you how to bezel set a 7mm crystal rivoli using Miyuki Delicas and seed beads.

You can create some really awesome pieces of jewellery by making some of these. Check out my step by step tutorial below!

Materials required

A selection of materials needed to bezel a crystal rivol with Miyuki seed beads and delicas.

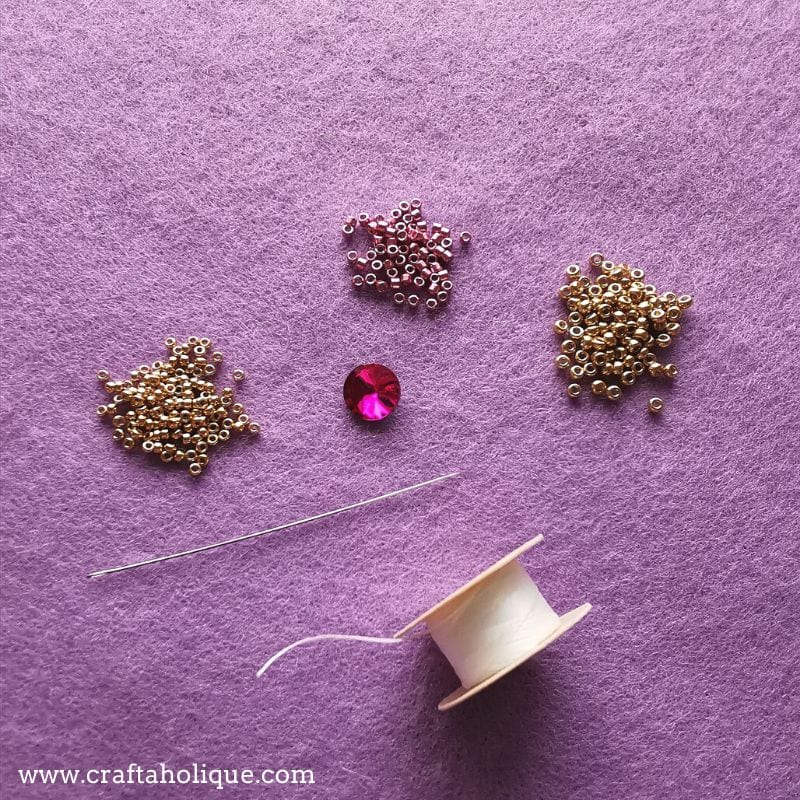
For this project, you’ll need:

  • 7mm crystal rivolis in the colour of your choice. (Note – PandaHall has a great selection available in bulk packs.)
  • Miyuki Delicas in size 11/0.
  • Miyuki round seed beads in size 11/0 and 15/0.
  • Beading thread, such as Nymo.
  • Beading needle in size 10.

Step 1 – creating a circle of beads

Creating a circle of Miyui Delicas in step one to bezel a rivoli.

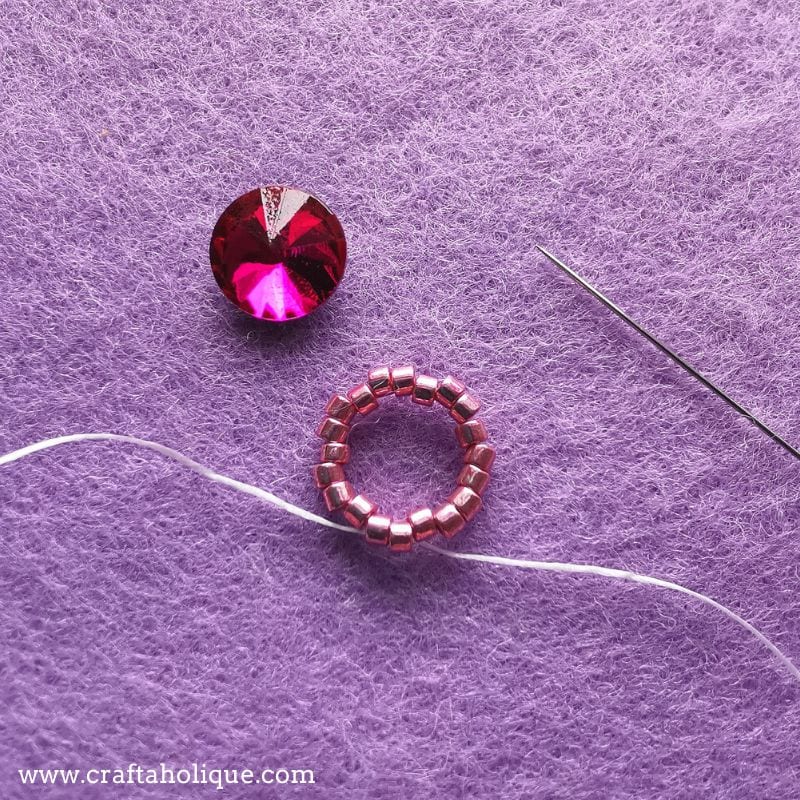
Thread your beading needle with 2 feet of thread and pick up 20 Miyuki Delicas. Move the beads down the thread, leaving an 8-inch tail. Go back through all 20 beads with your needle, and pull the beads into a circle. Go through the first bead only again to close up any gaps.

Step 2 – peyote stitch another row of Miyuki Delicas

Using peyote to create a circle of Miyuki Delica beads. The first step in creating a beaded bezel.

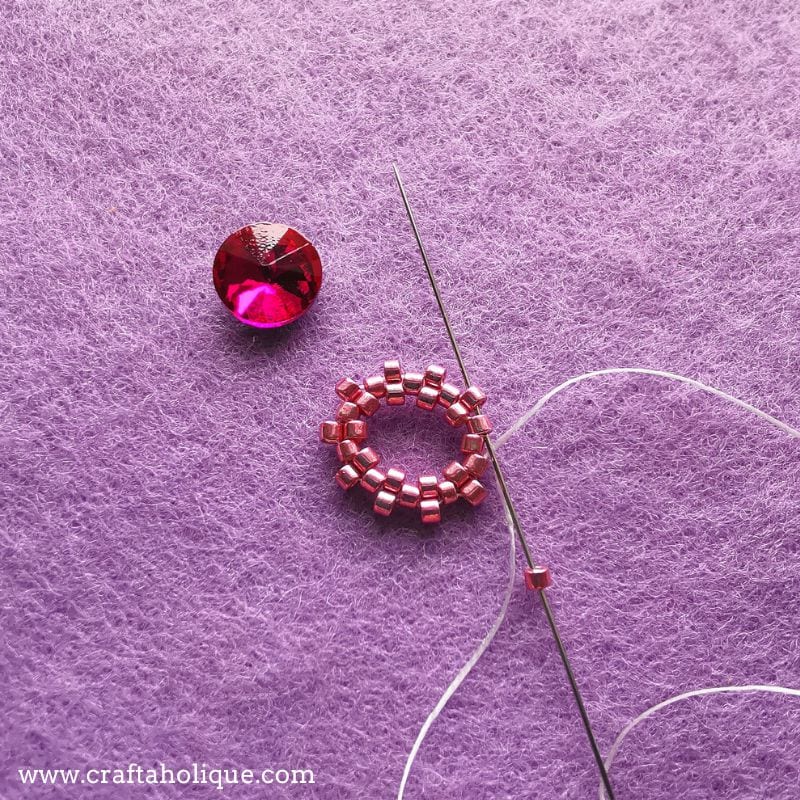
Use peyote stitch to work around the circle of beads. Here, you’ll add another 10 Miyuki Delicas. Peyote stitch involves skipping the bead next to the one where your thread is exiting out of, picking up a bead, and going through the bead after the one you’ve skipped. If you’re not sure how to do peyote stitch, check out my easy-to-follow peyote tutorial with pictures here.

Step 3 – peyote a row of seed beads

Using peyote stitch to create a beaded bezel with sead beads.

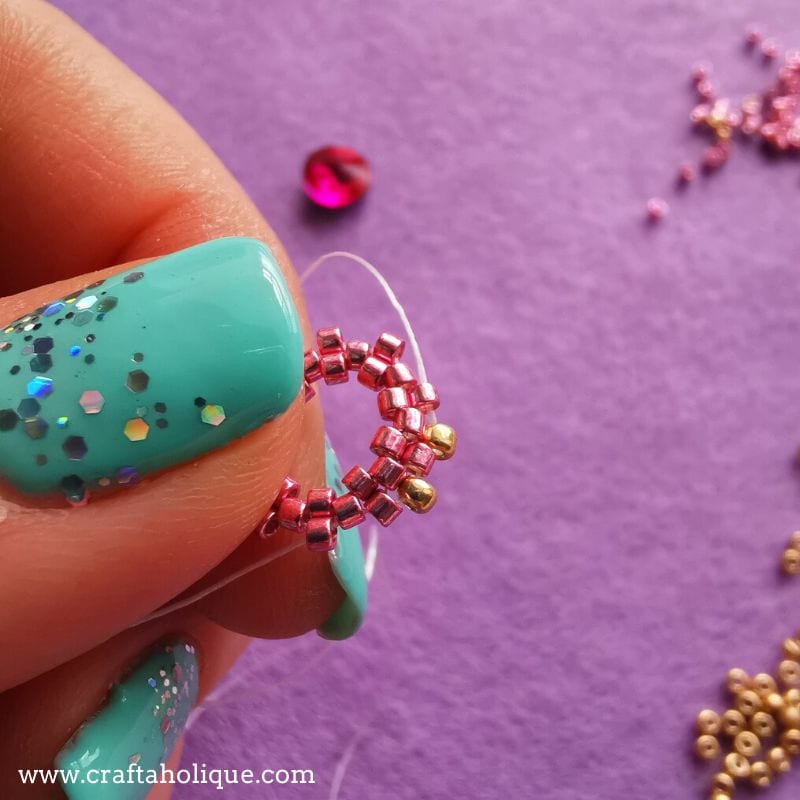
Just like you did in the previous step, you’ll continue to peyote around the circle of beads you’re creating. Only this time, you’ll pick up Miyuki round seed beads in size 11/0 instead of Delicas.

Step 4 – stepping up into the next row

Stepping up to the next round in peyote stitch to bezel a rivoli.

I didn’t take a picture of this when doing peyote with the Delicas. But this is how you step up to a new row (see pic above). You pick up your last bead in the row – here it’s a size 11/0 seed bead – then you go through the first bead of the last row (the Delica), then go through the first bead in your current row (the first seed bead you picked up). This puts you in place for the next row.

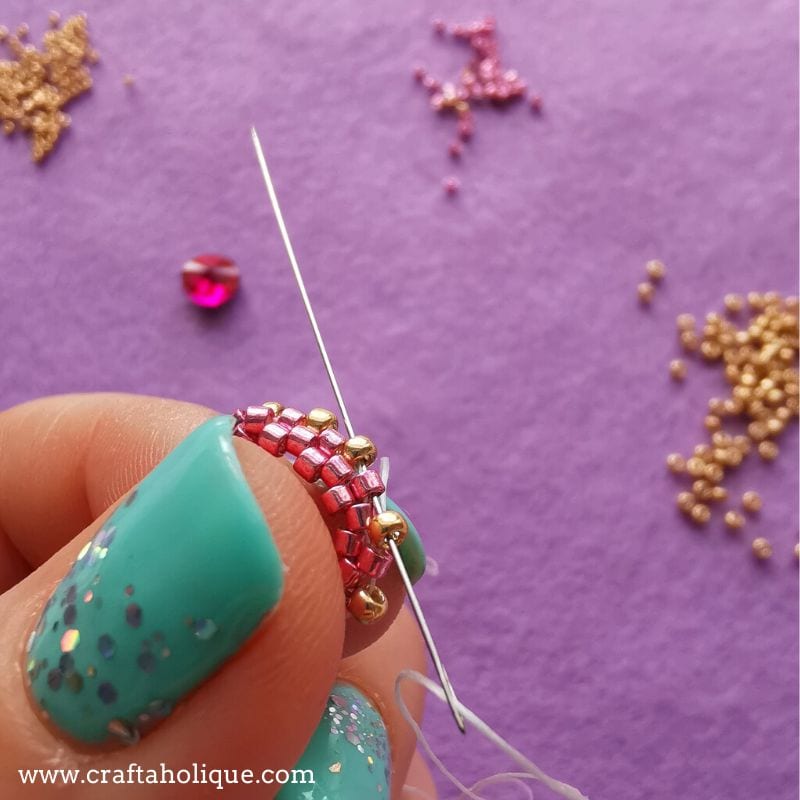
Step 5 – shaping the bezel and adding another row of peyote

How to bezel set a crystal rivoli

You’ll follow exactly the same process as before, but now you’ll use the size 15/0 seed beads. These are smaller and they’ll cinch the beadwork together, making it gather a little. This is how you’ll shape your bezel. As you peyote around, turn the beadwork in on itself, so that you’re not beading outwards, but instead creating that little frame needed for the rivoli.

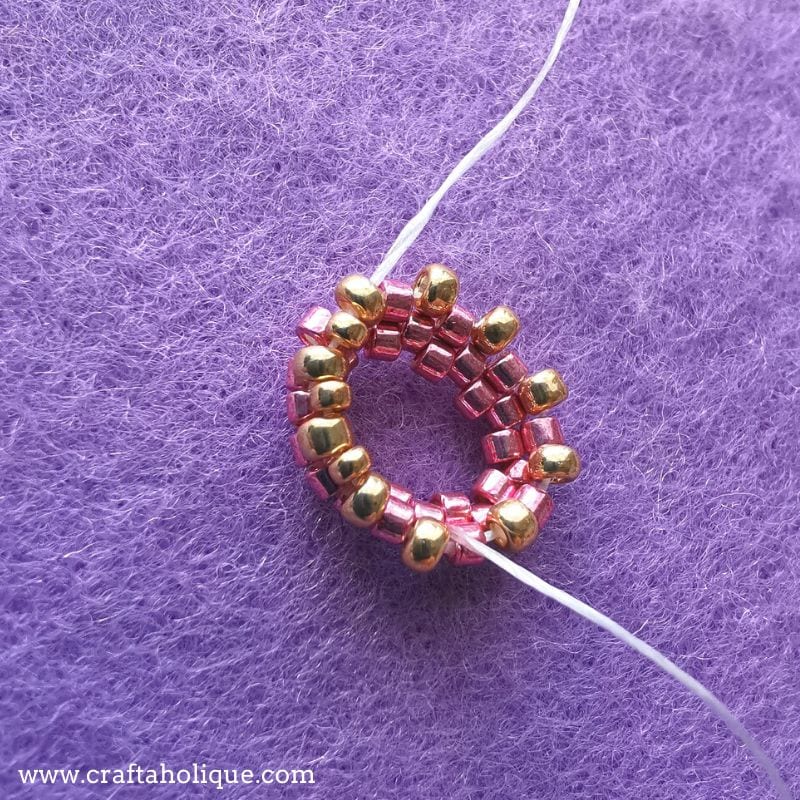
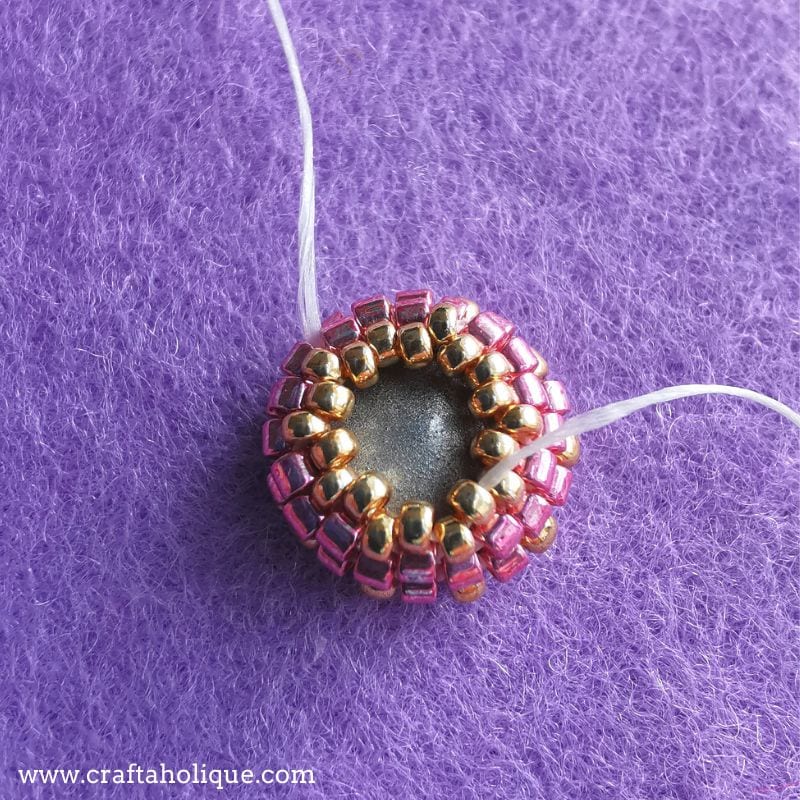
Step 6 – finishing the front of the beaded bezel

Creating a beaded bezel for a crystal rivoli

When you’ve done that row, step up and add another row of size 15/0 seed beads. Pull your thread tight so that you pull the beads inwards. When you’ve done this row, there’s no need to step up again. The front is now finished. Take your needle and go through the beads towards the back of the beadwork, as you’ll be doing the back of the bezel next!

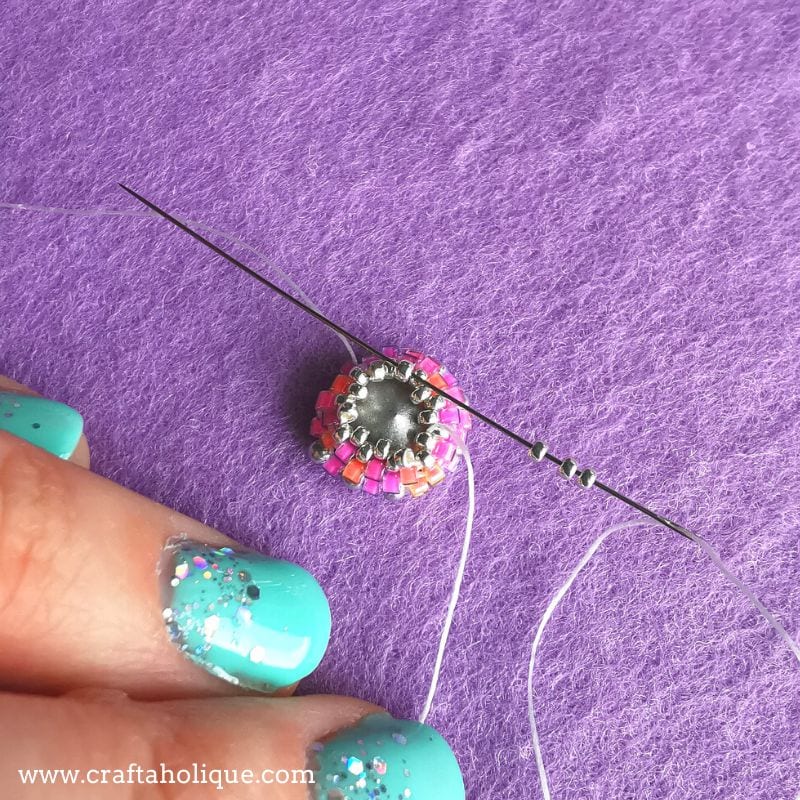
Step 7 – peyote the back of the bezel

Tidying up the back of a crystal rivoli with a beaded bezel

Use size 15/0 seed beads to peyote around the back of the rivoli. Do two rows, stepping up to each row as shown earlier.

Step 8 – finishing the back of the bezel

Finishing off a beaded bezel for a crystal rivoli

Step up to start the third row. (Excuse the different colour beadwork!) But this time, rather than doing normal peyote (pick up a bead, skip a bead, go through the next bead), pick up 3 size 15/0 seed beads and go through the third bead in the row. See pic above.

How to bezel a rivoli with seed beads - tidying up the back of the rivoli

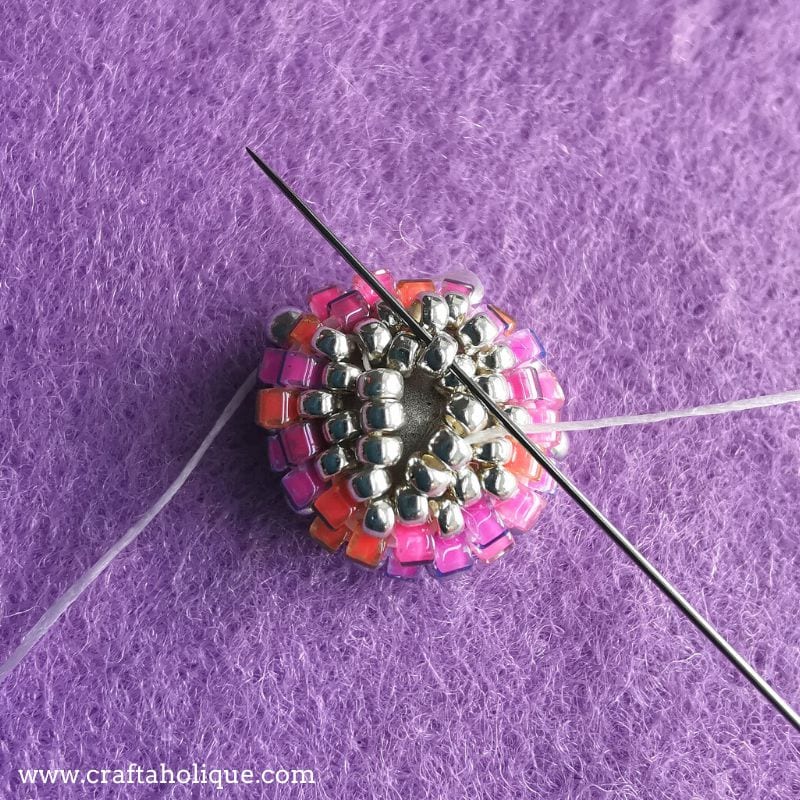
Repeat this step two more times. Then go up through the middle bead of the first section (set of three beads) you just created. Go directly through the next middle bead of the second section, and then the third. Pull the thread tightly so that it draws those middle 3 beads in and closes up the centre of the back of the bezel.

What the back of the beaded bezel looks like

Four rivolis bezel set with seed beads - view of the backs of them.

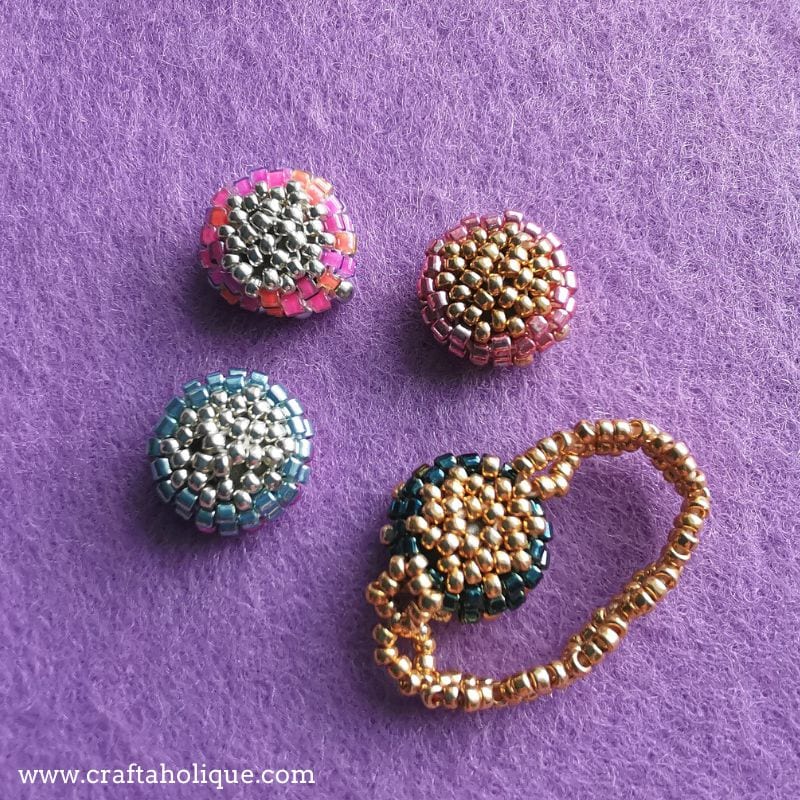
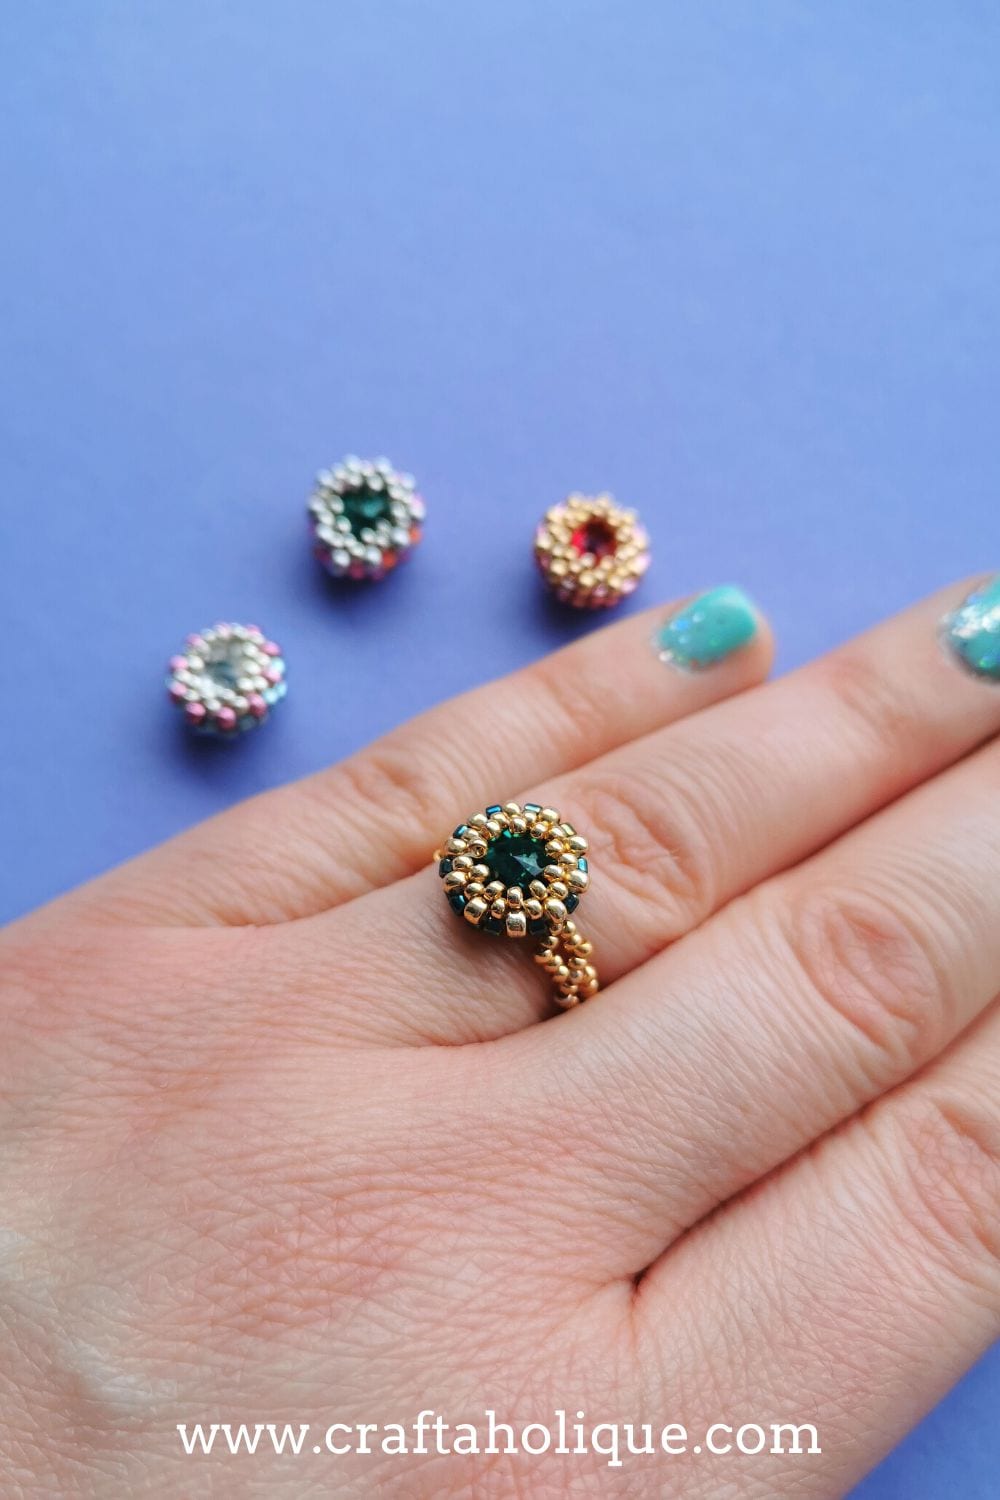
When you’re done, the back of your beaded rivolis should look something like the above. You can then turn your beaded rivolis into earrings, rings, pendants or even string a few of these little components together to make a bracelet. I created a ring with one of mine, I think it’s really pretty, what do you think?

A beaded ring made with a crystal rivoli and a seed bead bezel.

You can follow exactly the same process with larger rivolis, but you’ll need a larger number of Delica beads to make that first circle. Use an even number of beads if you want to do even count peyote (which is a bit easier than odd count).

Working out how many Delicas you need for the first circle is a trial and error process. Bead a circle of so many beads, then slot your rivoli inside it. You’ll want the circle to fit snugly around the rivoli. If the circle is too big to begin with, you’ll end up with a baggy bezel. If it’s too small, you’ll struggle slotting the rivoli in once you’ve done the front.

I hope you enjoyed this beading tutorial on how to bezel a rivoli! If you make some, let me know how you get on! Before you go, you might like to check out these other beading-related posts here on Craftaholique:

  • Silver Pretty Pellet Bracelet Kit Review
  • Candy Bead & Memory Wire Cuff Bracelet Tutorial
  • Pretty Chevron Beaded Earrings Tutorial

*Affiliate links to Etsy are included in this post. This means that I’ll earn a small commission if you use one of my affiliate links to make a purchase on Etsy (at no cost to you). This is one of the ways I’m able to keep Craftaholique up and running.

A step by step tutorial on how to bezel set a crystal rivoli using Miyuki Delica seed beads. Turn these into earrings, rings, pendants or bracelet components!

**All images © Craftaholique.

Share this post!
  • save 
  • share 
  • tweet 
  • email 

Filed Under: Beadwork, Jewellery making, Tutorials Hayley 3 Comments

Reader Interactions

Mother’s Day Etsy Gift Guide
Free Online Craft Classes! Unlimited Access Creativity Event from Bluprint

Comments

  1. 1

    Shari James says

    March 21, 2020 at 8:51 pm

    Hayley this beveled rivaling is beautiful! Thank you for the tutorial! Also your nails are a work of art. So pretty!

    Reply
    • 2

      Hayley says

      March 22, 2020 at 9:16 am

      Thank you so much for stopping by and commenting! Glad you like this tutorial (and thank you re my nails)! 🙂

      Reply
  2. 3

    Bev says

    February 13, 2021 at 2:20 pm

    I can’t wait to try this!

    Reply

Leave a Reply Cancel reply

Your email address will not be published. Required fields are marked *

Primary Sidebar

Welcome!

Welcome!

Hi, I'm Hayley! Thanks for visiting Craftaholique, my little corner of the internet where I blog about crafts, beading, handmade products and lots of other stuff relating to creativity. Stay a while and have a browse!

Connect

  • E-mail
  • Facebook
  • Instagram
  • Pinterest
  • Twitter

Advert


Instagram

Work in progress! A new pattern I'm working on. Lo Work in progress! A new pattern I'm working on. Loving the metallic green colour. 😍 #beads #beadwork #peyote #bracelets #braceletpattern #peyotestitch #jewellerymaking #crafts #crafting
Hi all! It's been a very long time since I've post Hi all! It's been a very long time since I've posted here. I've been working on a new venture - surface pattern design. This is my first attempt at a seamless pattern. It's part of a collection I'm working on called 'Mum's Garden'. Mum loved hedgehogs, and they always frequented her garden to enjoy the food she put out for them. 😍 Honest opinions! What do you think? Could this work for wrapping paper, notebook covers, etc? Thanks for looking! #surfacepatterndesign #creativebusiness #creativeentrepreneur #graphicdesign #digitalart #hedgehogs #patterns #seamlesspattern
I finally finished this bead loom bracelet! Starte I finally finished this bead loom bracelet! Started it before the first lockdown... I think I lost my mojo for a while! So this is a flat piece of beadwork, which I then glued onto a cuff bracelet blank.
Started this loom beading project last May... Prou Started this loom beading project last May... Proud to say I finally finished it more than one year later! More photos coming soon! What's your longest ever project? #beads #beadwork #loombeading #crafts #crafting #craftblogger #crafty #longestprojectever
My latest beaded creation! Peyote with a twist. Lo My latest beaded creation! Peyote with a twist. Love the chunkiness of it and how it shimmers with the galvanised silver Miyuki Delica beads. #beads #beadwork #beadweavingpeyote #peyote #flatpeyotestitch #silver #beaded #beadedjewelryofinstagram #beadedring #beadedjewelry #miyukidelica #miyukipeyote #miyuki #miyukibeads #beading #crafts #crafting #craftblogger
My latest tubular peyote bracelet! It's made up of My latest tubular peyote bracelet! It's made up of hundreds of tiny Miyuki Delica beads in vibrant colours of metallic blue, silver, white and pink. The pattern is available in my Etsy shop, Craftaholique Designs. #beads #beadwork #beadweavingpeyote #tubularpeyotestitch #miyukipeyote #beading #beadingpattern #etsyshop #etsysellersofinstagram #etsyseller #etsyshopowner #bracelets #vibrant #tubularpeyote #beadaddict #beadaddiction #miyuki #miyukibeads
My finished bead embroidery - I've used it as an e My finished bead embroidery - I've used it as an embellishment for a beadwork storage case I've just made. I upcycled the case from an old padfolio / conference folder. Inside there's an integrated beading mat where I can do my beadwork - no more beads rolling away! I've posted a tutorial on my blog (link in bio).
My latest project... Bead embroidered flowers! I'm My latest project... Bead embroidered flowers! I'm making this as an embellishment for something. Will post the final project pic soon! #beadwork #beadembroidery #embroidery #embroiderydesign #embroideryart #embroidelicious #flowers #beads #beadedembroidery #beadedembellishment #crafts #crafting #keepcraftingcarryon #keepcraftalive #keepcraftingandcarryon #beaded #beadaddict #beadaddiction #embroideryhoop #craftblogger #crafty
Just finished this set of Miyuki Delica bracelets Just finished this set of Miyuki Delica bracelets in pretty colours of peach, white, pink and gold! I made the two diamond pattern bracelets using a bead loom. The single strand bracelet I just strung together. What do you think to my creation? #beads #beadwork #beadloom #beadloompattern #beadloomingbracelet #beadlooming #beadloombracelets #beadweaving #loombeading #loombead #beadingpattern #beadedjewelryofinstagram #beadaddict #beadaddiction #miyuki #miyukibeads #miyukidelica #crafts #crafting #craftblogger #crafty #bead #craftblogger #beadedbracelets #cuffbracelet #stackingbracelets
Though I've been beading for many years, this is t Though I've been beading for many years, this is the first time I've used a bead loom! It's pretty straightforward and quicker than peyote. #beading #beadloom #beadlooming #beadloomingbracelet #beadloomingnewbie #beadloombracelets #beadloompattern #beadwork #beadingpattern #miyuki #miyukibeads
I had tons of fun over the Easter weekend making t I had tons of fun over the Easter weekend making this rag rug sample with a kit from @raggedlife. This was part of an online workshop on rag rugging, with four other craft bloggers (hosted on Zoom by Elspeth at Ragged Life). It was brilliant! I'd highly recommend it. I've just posted about my experience on the blog - see link in bio.
Tomorrow, I'm taking part in an online rag rug wor Tomorrow, I'm taking part in an online rag rug workshop with @raggedlife! Can't wait, I've been wanting to try out rag rugging for ages. The class is being hosted on Zoom and will be fully interactive. Will post my project when I've done it!
Load More… Follow me on Instagram

Popular Posts

Popular Posts

Recent Posts

  • Craftaholique is being revived!
  • I’m back (with a new bead loom bracelet pattern)
  • Leaf Art Craft Project with Sharpie Pens
  • Chevron Tubular Peyote Bracelet Pattern
  • DIY Beadwork Storage Case (with Beading Mat)

Advert


Recent Comments

  • Hayley on BeadTool 4 Review – Make Your Own Beading Patterns
  • Susan Nicholas on BeadTool 4 Review – Make Your Own Beading Patterns
  • Heather on How I Salvaged My Tarnished Silver Pandora Bracelet
  • Hayley on DIY Beadwork Storage Case (with Beading Mat)
  • Hayley on How to Use Pinterest to Significantly Boost Your Etsy Sales

Looking for Something?

Footer

My favourite place to shop handmade!

Featured on Feedspot

Disclaimer

Craftaholique is a personal blog. The content you'll find here is for your entertainment purposes only. Craftaholique is a participant in the Amazon Services LLC Associates Program, an affiliate advertising program designed to provide a means for sites to earn advertising fees by advertising and linking to www.amazon.co.uk and www.amazon.com. Read the full site disclaimer here.

Blogroll

  • Free Pretty Things For You
  • Golden Age Beads
  • Off The Beaded Path
  • The Graphics Fairy

© 2020 Craftaholique