• Skip to primary navigation
  • Skip to main content
  • Skip to primary sidebar
  • Skip to footer
  • Home
  • Tutorials
  • Crafts
    • Jewellery Making
      • Everything jewellery
      • Beadwork
      • Wire jewellery
      • Book reviews
    • Feltmaking
    • Crochet
    • Knitting
    • Kid’s crafts
    • Book reviews
    • Other
  • Inspiration
    • Everything inspirational
    • Handmade showcase
    • Colours
    • Materials
    • Crafty Links
    • Start a Blog
  • Lifestyle
    • Tips
    • Recipes
  • About
    • Advertise
  • Contact
  • Privacy Policy
    • Cookie Policy
  • Disclaimer / Disclosure

Craftaholique

Embracing The Handmade Life | UK Craft Blog

You are here: Home / Jewellery making / Candy Bead & Memory Wire Cuff Bracelet Tutorial

July 21, 2017

Candy Bead & Memory Wire Cuff Bracelet Tutorial

Candy bead and memory wire bracelet tutorial by Craftaholique

*Affiliate links are included in this post.

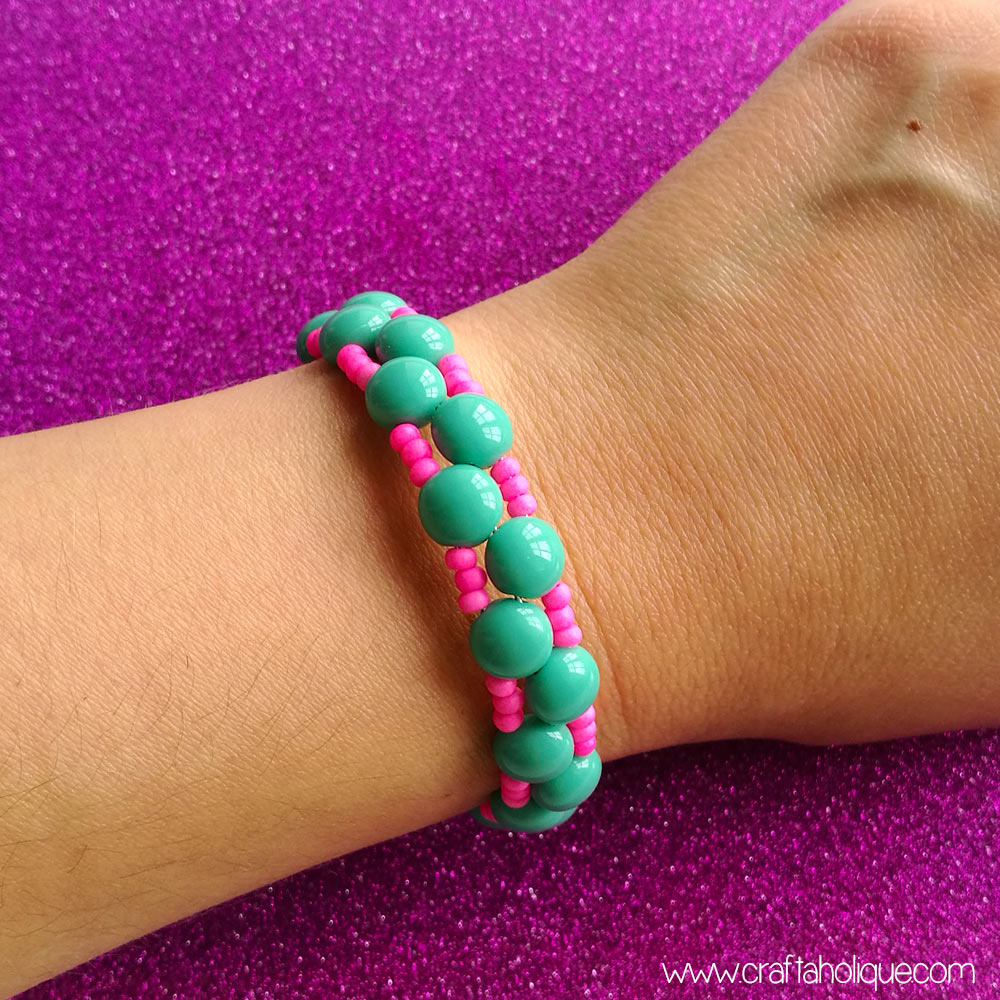
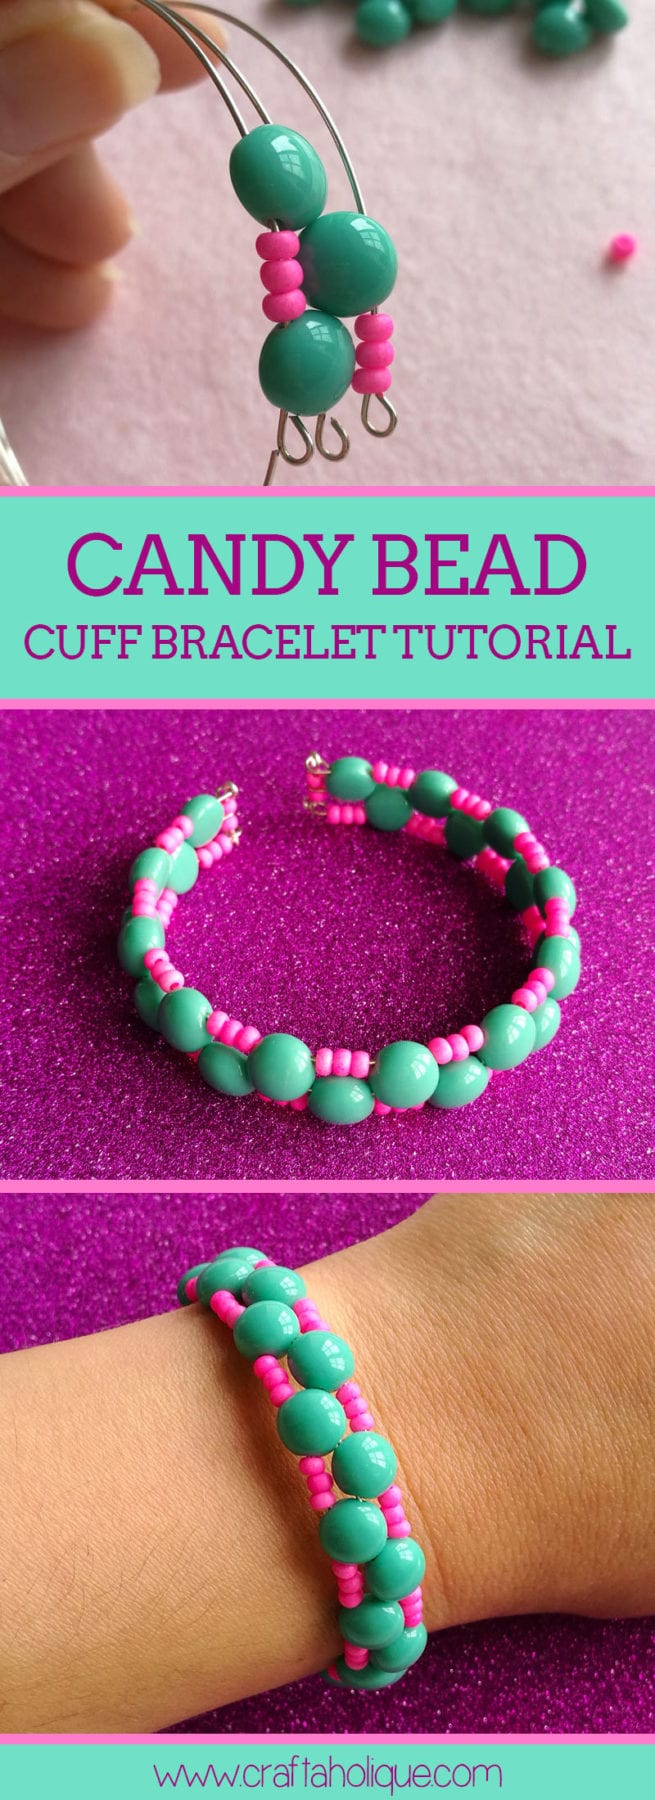
I have a pretty beaded bracelet tutorial to share with you today! Whilst ordering some new Miyuki Delicas for my next peyote bracelet project, I added some super cute candy beads to my order too. These are drilled with 2 holes, meaning that you can do all sorts of things with them!

Follow my tutorial below if you’d like to make one of these bracelets. This is a great project for beginner beaders as you don’t need many materials (and it’s quick to make too).

You’ll need the following supplies to get started!

Candy bead and memory wire bracelet tutorial by Craftaholique

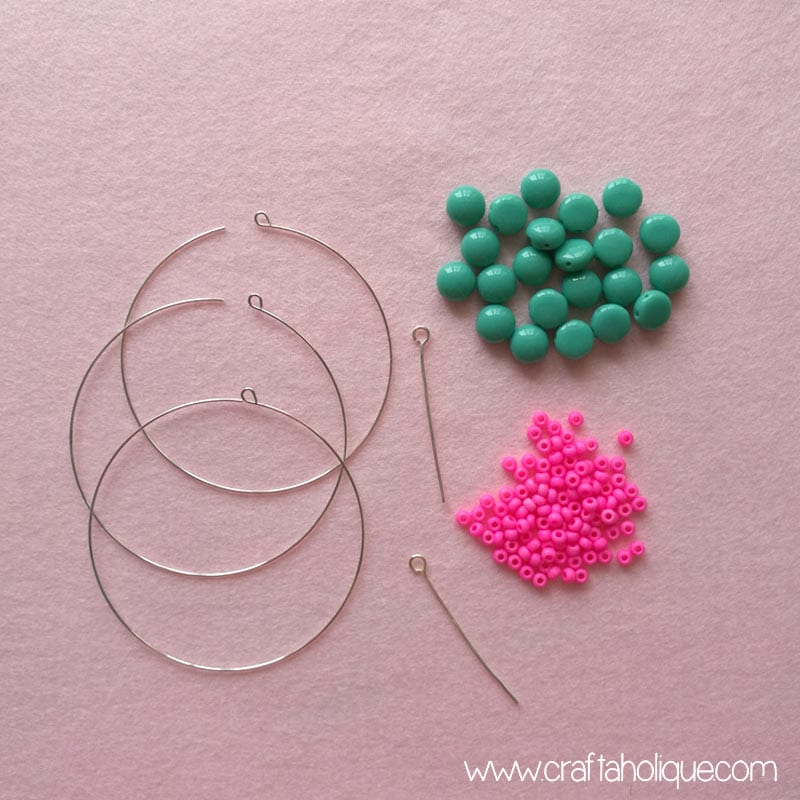
  • A selection of turquoise 8mm 2 hole Czech glass candy beads (I’ve used 23 but you may need a few more depending on the size of your wrist – 30 beads should be the most you’ll need though).
  • Toho round seed beads size 8/0 in pink.
  • Silver tone memory wire (I’ve used 55cm diameter wire to fit my wrist, but you can go larger if you like – just check that the coils fit your wrist before you start).
  • 2 x silver tone eye pins or head pins.
  • Jewellery making tools – round nose pliers and a pair of heavy duty wire cutters.

Step 1: Cutting the memory wire

Memory wire comes in a continuous ring of coils, so you’ll need to trim off three individual coils and make a loop at one end of each coil with your round nose pliers, as shown in the materials photo above.

Step 2: Adding the first candy bead

Memory wire bracelet tutorial with candy beads

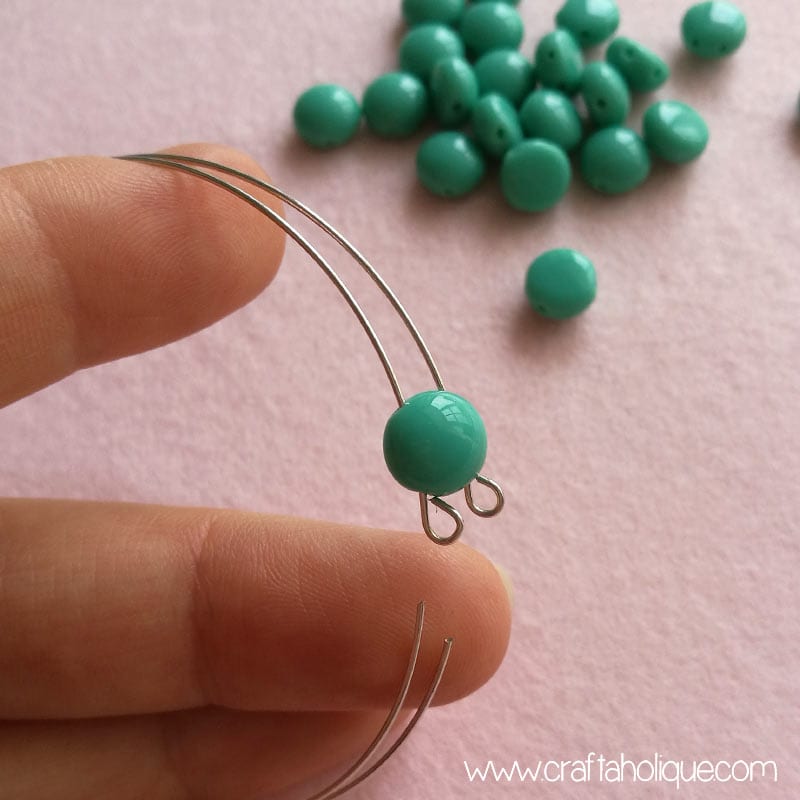
Take two of the memory wire coils and holding them side by side, slide on one of the candy beads, making sure to thread the wires through the two holes in the bead as shown above.

Step 3: Adding seed beads to create a pattern

Seed bead and memory wire bracelet tutorial

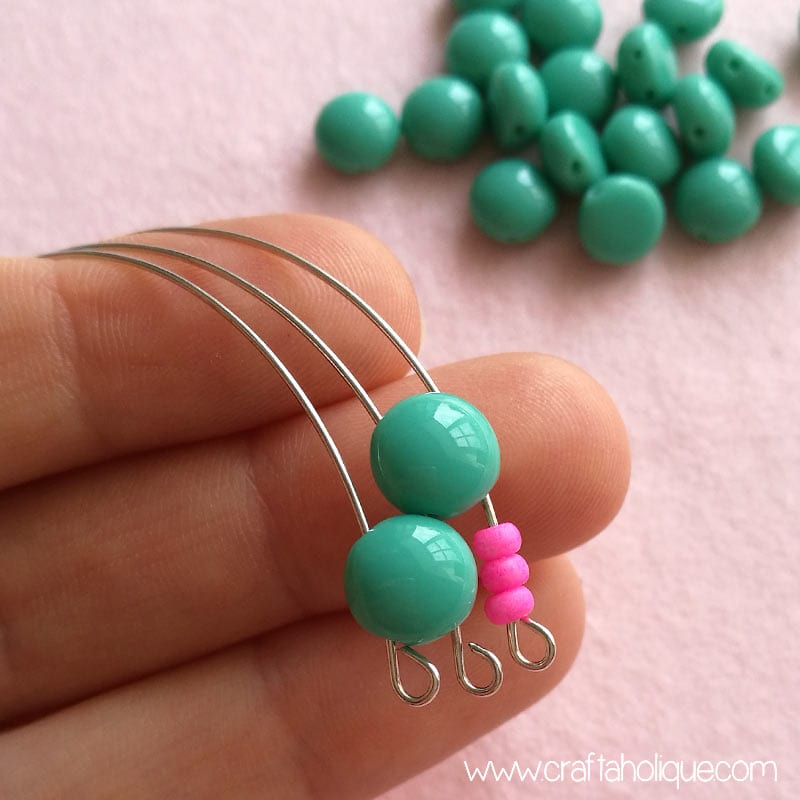
Bring in the third memory wire coil for this step. Thread on 3 x seed beads on this new coil and then add another candy bead above them. Use the middle wire coil to thread through the other hole in the new candy bead.

This will secure all three memory wire coils together – although the beads may slide around a little at first!

Step 4: Continuing the pattern

Candy bead and memory wire bracelet tutorial

Add 3 x seed beads to the left hand side wire now, above the first candy bead you added earlier. Then add a third candy bead over the new seed beads and use the middle wire again to go through the second hole of the new candy bead.

Step 5: Work your way around the bracelet

Free jewellery making tutorials from Craftaholique

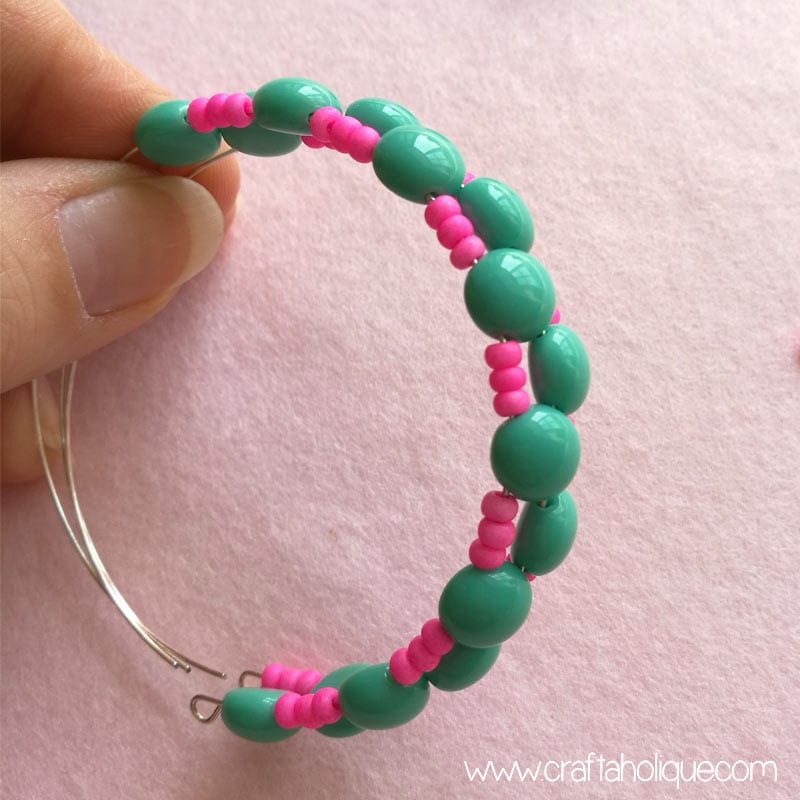
Continue alternating between candy beads and seed beads in the pattern I’ve just outlined, all the way around the memory wire coils. When you get to the halfway point, the bracelet will start to become quite sturdy!

Step 6: Finishing the ends of the bracelet

Memory wire bracelet project for beginners

When you’ve threaded on your beads all the way around, you’ll need to make loops in the ends of the wires to stop your beads from falling off. Make sure the beads are sitting as they should be i.e. no gaps, before you make the end loops.

You could leave the ends as they are, but if you want them to look a little prettier, you can add a little decoration to them. Using your eye pins or head pins, trim off the ends (so you’ll have straight pieces of wire).

Make a tiny loop with your round nose pliers in one end but don’t close it up yet! Thread the wire through the first loop, add a seed bead, then thread the wire through the middle loop and add another seed bead. Finally, thread the wire through the last loop, trim it and make another tiny loop. Close up both loops at this point, attaching them to the outside loops of the memory wire.

This part is a little fiddly but worth doing!

Candy bead and memory wire bracelet tutorial by Craftaholique

Finally…

Your finished bracelet should fit snugly against your wrist when you’re done! I hope you enjoyed this jewellery making tutorial – for more posts like this, why not subscribe to my newsletter at the top of the page to be kept updated?

Before you go, here are some other tutorials you might like:

  • Beaded hoop earrings tutorial
  • DIY boho / festival earrings tutorial
  • How to make a pretty tassel necklace

*Affiliate links are included in this post to Etsy. This means that if you make a purchase through one of my links, I will earn a small commission at no cost to you. I only ever recommend products that I think are great and any commissions help me to keep this site up and running. Thank you for using my links if you’re able to.

Candy bead and memory wire bracelet tutorial from Craftaholique

*Images © Craftaholique.

Share this post!
  • save 
  • share 
  • tweet 
  • email 

Filed Under: Jewellery making, Tutorials Hayley 3 Comments

Reader Interactions

Flower Arrangement Tutorial with Wild Flowers
“Ombre Ribbons” Peyote Stitch Bracelet Pattern

Comments

  1. 1

    Mars says

    January 25, 2018 at 11:06 pm

    These are so cute!

    Reply
    • 2

      Hayley says

      February 7, 2018 at 11:08 am

      Thank you! 🙂

      Reply

Trackbacks

  1. Women Fashion - 143 Straightforward DIY Bracelets You’ll Fall in Love With These - Lily Ideas says:
    November 11, 2019 at 4:10 am

    […] You’ll positively prefer to reward this one other lovely bracelet creation that has been accomplished to amaze and encourage! Right here the customized glassy sweet beads and pink seed beads have been slipped onto the reminiscence cuff wire to make gorgeously colourful bead cuff bracelets that may even make a fantastic present to family and friends members! One other nice however straightforward to make bracelet! Full challenge directions right here craftaholique […]

    Reply
  2. 143 Easy DIY Bracelets You'll Fall in Love With These ⋆ DIY Crafts says:
    May 19, 2020 at 9:41 pm

    […] You will definitely like to praise this another adorable bracelet creation that has been done to amaze and inspire! Here the custom glassy candy beads and pink seed beads have been slipped onto the memory cuff wire to make gorgeously colorful bead cuff bracelets that will also make a great gift to friends and family members! Another great but easy to make bracelet! Complete project instructions here craftaholique […]

    Reply

Leave a Reply Cancel reply

Your email address will not be published. Required fields are marked *

Primary Sidebar

Welcome!

Welcome!

Hi, I'm Hayley! Thanks for visiting Craftaholique, my little corner of the internet where I blog about crafts, beading, handmade products and lots of other stuff relating to creativity. Stay a while and have a browse!

Connect

  • E-mail
  • Facebook
  • Instagram
  • Pinterest
  • Twitter

Advert


Instagram

Work in progress! A new pattern I'm working on. Lo Work in progress! A new pattern I'm working on. Loving the metallic green colour. 😍 #beads #beadwork #peyote #bracelets #braceletpattern #peyotestitch #jewellerymaking #crafts #crafting
Hi all! It's been a very long time since I've post Hi all! It's been a very long time since I've posted here. I've been working on a new venture - surface pattern design. This is my first attempt at a seamless pattern. It's part of a collection I'm working on called 'Mum's Garden'. Mum loved hedgehogs, and they always frequented her garden to enjoy the food she put out for them. 😍 Honest opinions! What do you think? Could this work for wrapping paper, notebook covers, etc? Thanks for looking! #surfacepatterndesign #creativebusiness #creativeentrepreneur #graphicdesign #digitalart #hedgehogs #patterns #seamlesspattern
I finally finished this bead loom bracelet! Starte I finally finished this bead loom bracelet! Started it before the first lockdown... I think I lost my mojo for a while! So this is a flat piece of beadwork, which I then glued onto a cuff bracelet blank.
Started this loom beading project last May... Prou Started this loom beading project last May... Proud to say I finally finished it more than one year later! More photos coming soon! What's your longest ever project? #beads #beadwork #loombeading #crafts #crafting #craftblogger #crafty #longestprojectever
My latest beaded creation! Peyote with a twist. Lo My latest beaded creation! Peyote with a twist. Love the chunkiness of it and how it shimmers with the galvanised silver Miyuki Delica beads. #beads #beadwork #beadweavingpeyote #peyote #flatpeyotestitch #silver #beaded #beadedjewelryofinstagram #beadedring #beadedjewelry #miyukidelica #miyukipeyote #miyuki #miyukibeads #beading #crafts #crafting #craftblogger
My latest tubular peyote bracelet! It's made up of My latest tubular peyote bracelet! It's made up of hundreds of tiny Miyuki Delica beads in vibrant colours of metallic blue, silver, white and pink. The pattern is available in my Etsy shop, Craftaholique Designs. #beads #beadwork #beadweavingpeyote #tubularpeyotestitch #miyukipeyote #beading #beadingpattern #etsyshop #etsysellersofinstagram #etsyseller #etsyshopowner #bracelets #vibrant #tubularpeyote #beadaddict #beadaddiction #miyuki #miyukibeads
My finished bead embroidery - I've used it as an e My finished bead embroidery - I've used it as an embellishment for a beadwork storage case I've just made. I upcycled the case from an old padfolio / conference folder. Inside there's an integrated beading mat where I can do my beadwork - no more beads rolling away! I've posted a tutorial on my blog (link in bio).
My latest project... Bead embroidered flowers! I'm My latest project... Bead embroidered flowers! I'm making this as an embellishment for something. Will post the final project pic soon! #beadwork #beadembroidery #embroidery #embroiderydesign #embroideryart #embroidelicious #flowers #beads #beadedembroidery #beadedembellishment #crafts #crafting #keepcraftingcarryon #keepcraftalive #keepcraftingandcarryon #beaded #beadaddict #beadaddiction #embroideryhoop #craftblogger #crafty
Just finished this set of Miyuki Delica bracelets Just finished this set of Miyuki Delica bracelets in pretty colours of peach, white, pink and gold! I made the two diamond pattern bracelets using a bead loom. The single strand bracelet I just strung together. What do you think to my creation? #beads #beadwork #beadloom #beadloompattern #beadloomingbracelet #beadlooming #beadloombracelets #beadweaving #loombeading #loombead #beadingpattern #beadedjewelryofinstagram #beadaddict #beadaddiction #miyuki #miyukibeads #miyukidelica #crafts #crafting #craftblogger #crafty #bead #craftblogger #beadedbracelets #cuffbracelet #stackingbracelets
Though I've been beading for many years, this is t Though I've been beading for many years, this is the first time I've used a bead loom! It's pretty straightforward and quicker than peyote. #beading #beadloom #beadlooming #beadloomingbracelet #beadloomingnewbie #beadloombracelets #beadloompattern #beadwork #beadingpattern #miyuki #miyukibeads
I had tons of fun over the Easter weekend making t I had tons of fun over the Easter weekend making this rag rug sample with a kit from @raggedlife. This was part of an online workshop on rag rugging, with four other craft bloggers (hosted on Zoom by Elspeth at Ragged Life). It was brilliant! I'd highly recommend it. I've just posted about my experience on the blog - see link in bio.
Tomorrow, I'm taking part in an online rag rug wor Tomorrow, I'm taking part in an online rag rug workshop with @raggedlife! Can't wait, I've been wanting to try out rag rugging for ages. The class is being hosted on Zoom and will be fully interactive. Will post my project when I've done it!
Load More… Follow me on Instagram

Popular Posts

Popular Posts

Recent Posts

  • Craftaholique is being revived!
  • I’m back (with a new bead loom bracelet pattern)
  • Leaf Art Craft Project with Sharpie Pens
  • Chevron Tubular Peyote Bracelet Pattern
  • DIY Beadwork Storage Case (with Beading Mat)

Advert


Recent Comments

  • Hayley on BeadTool 4 Review – Make Your Own Beading Patterns
  • Susan Nicholas on BeadTool 4 Review – Make Your Own Beading Patterns
  • Heather on How I Salvaged My Tarnished Silver Pandora Bracelet
  • Hayley on DIY Beadwork Storage Case (with Beading Mat)
  • Hayley on How to Use Pinterest to Significantly Boost Your Etsy Sales

Looking for Something?

Footer

My favourite place to shop handmade!

Featured on Feedspot

Disclaimer

Craftaholique is a personal blog. The content you'll find here is for your entertainment purposes only. Craftaholique is a participant in the Amazon Services LLC Associates Program, an affiliate advertising program designed to provide a means for sites to earn advertising fees by advertising and linking to www.amazon.co.uk and www.amazon.com. Read the full site disclaimer here.

Blogroll

  • Free Pretty Things For You
  • Golden Age Beads
  • Off The Beaded Path
  • The Graphics Fairy

© 2020 Craftaholique